

Welcome to Part 8 of my VVD on VxRail Breadcrumb Build Series
- Part 1: Preparation
- Part 2: Deploying the Management VxRail
- Part 3: Adjusting the Management VxRail
- Part 4: Installing NSX for Management VxRail
- Part 5: Logical Networking for Management VxRail
- Part 6: Deploying the Shared Edge/Compute VxRail
- Part 7: Adjusting the Shared Edge/Compute VxRail
- Part 8: Installing NSX for Shared Edge/Compute VxRail
- Part 9: Logical Networking for Shared Edge/Compute VxRail
- Part 10: Conclusion
As before, we’ll deploy and tweak the NSX infrastructure for the SEC vCenter in this post, and then deploy the logical networking in the next post
Anything in the format [input_value] represents a value from your preparation that you should insert (without the square brackets of course)
Deploy and Configure the NSX Instance for the SEC Cluster
- Log on [mgmt-vcenter-fqdn]
- Deploy NSX Manager to Management Cluster
- Name: [sec-nsx-manager-vmname]
- Storage
- Thin provision
- vSAN Default Storage Policy
- Network: [mgmt-portgroup]
- DNS Server list: [dns-server]
- Domain Search List: [ad-domain]
- Default IPv4 Gateway: [mgmt-gateway]
- Hostname: [sec-nsx-manager-fqdn]
- Network 1 IPv4 Address: [sec-nsx-manager-ip]
- Network 1 Netmask: [mgmt-mask]
- Enable SSH = True
- NTP Server List = [ntp-ip]
- Default Password = [sec-nsx-manager-admin-password]
- CEIP = True
- Power on NSX Manager
Replace the Certificate of NSX Manager
- Log into [sec-nsx-manager-fqdn]
- Home -> Manage Appliance Settings -> Manage -> SSL Certificates -> Upload PKCS#12 Keystore.
- Upload [sec-nsx-manager-hostname].4.p12
- Reboot NSX Manager
Connect SEC NSX Manager to vCenter
- Log into [sec-nsx-manager-fqdn]
- Manage vCenter Registration -> Lookup Service URL -> Edit
- URL: [psc-lb-virtual-fqdn]
- Port: 443
- Username: administrator@vsphere.local
- Password: [sso-admin-password]
- Accept Certificate Thumbprint
- vCenter Server -> Edit
- URL: [sec-vcenter-fqdn]
- Username: [nsx-admin]@[ad-domain] / [nsx-admin-password]
- Accept Certificate Thumbprint
Assign Administrative Access to NSX
- Log into [sec-vcenter-fqdn] as [nsx-admin]@[ad-domain]
- Networking & Security -> Users and Domains -> Add -> Specify a vCenter User
- administrator@vsphere.local as Enterprise Administrator
Deploy the SEC NSX Controllers
- Log into [sec-vcenter-fqdn]
- Assign NSX Primary Role
- Networking & Security -> Installation and Upgrade -> Management -> Actions -> Assign Primary Role
- Create IP Pool
- Groups & Tags -> IP Pools-Add
- Name: sec-nsx-controllers
- Gateway: [mgmt-gateway]
- Prefix Length: [mgmt-prefix-length]
- Primary DNS: [dns-server]
- DNS Suffix: [ad-domain]
- Add Range: [sec-nsx-controller-ip-range]
- Deploy Controllers (1 at a time)
- Installation and Upgrade -> Management -> NSX Controller Nodes -> Add -> Choose Manager
- Complex Password: [sec-nsx-controller-complex-password]
- Name: [sec-nsx-controller01-name]
- Datacenter: [sec-datacenter]
- Cluster/ResourcePool: regiona-sec-rp-edge
- Datastore: [sec-vsan-datastore]
- Connected to: [mgmt-network]
- Select IP Pool: sec-nsx-controllers
- Repeat for
- [sec-nsx-controller02-name]
- [sec-nsx-controller03-name]
- Enable CDO Mode.
- Installation and Upgrade -> Management -> Select Manager -> Actions -> Enable CDO Mode
- DRS affinity rules for Controllers
- Select [sec-cluster] -> Configure -> VM/Host Rules -> Add
- Rule name: anti-affinity-rule-nsxc
- Separate Virtual Machines
- Select all Controllers
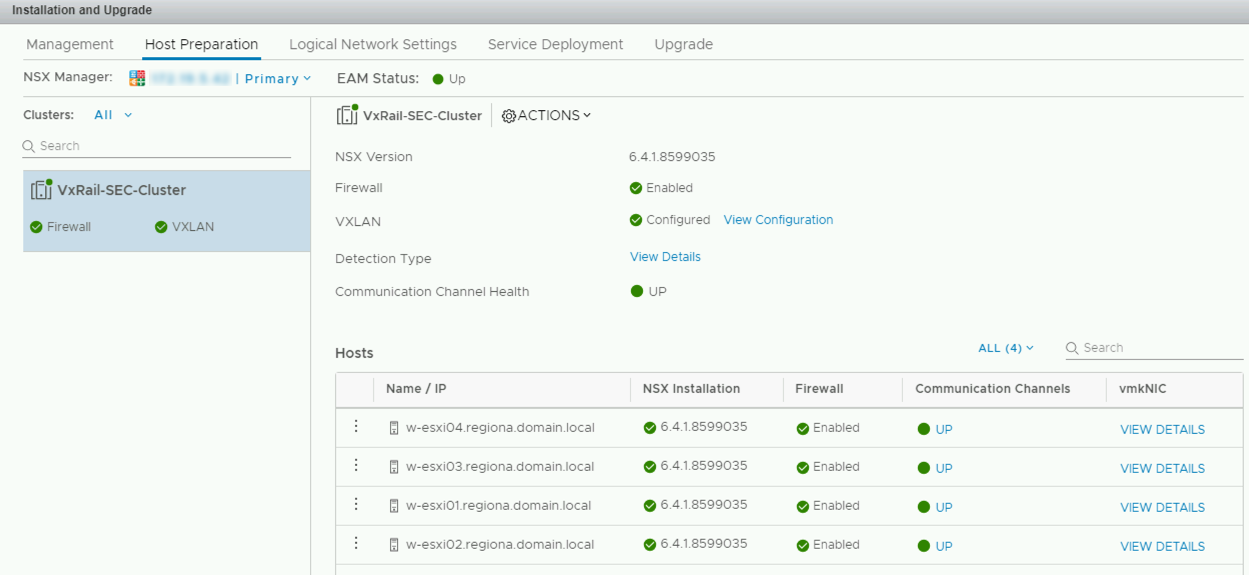
Prepare the ESXi Hosts
- Networking & Security -> Installation and Upgrade -> Host Preparation -> Actions -> Install
Finishing the basic NSX configuration
- Segment ID Allocation
- Networking & Security -> Installation and Upgrade -> Logical Network Settings -> VXLAN Settings -> Segment IDs -> Edit
- Segment ID Pools: [sec-nsx-segment-id-pools]
- Enable Multicast addressing: Selected
- Multicast Addresses: [sec-nsx-multicast-addresses]
- Universal Segment ID Pool: [sec-nsx-universal-segment-id-pool]
- Enable Universal Multicast addressing: Selected
- Universal Multicast Addresses: [sec-nsx-universal-multicast-addresses]
- Networking & Security -> Installation and Upgrade -> Logical Network Settings -> VXLAN Settings -> Segment IDs -> Edit
- VXLAN networking
- Networking & Security -> Installation and Upgrade -> Host Preparation -> Actions -> Configure VXLAN
- Switch: [sec-vds]
- VLAN: [sec-vxlan-vlan]
- MTU: 9000
- VMKNic IP Addressing: Use DHCP**
- VMKNic Teaming Policy: Load Balance – SRCID
- VTEP: 2
- Networking & Security -> Installation and Upgrade -> Host Preparation -> Actions -> Configure VXLAN
- Transport Zones
- Networking & Security -> Installation and Upgrade -> Logical Network Settings -> Transport Zones -> Add
- Name: SEC Universal Transport Zone
- Mark this object for Universal Synchronization: On
- Replication Mode: Hybrid
- Select clusters to be part of the Transport Zone: [sec-cluster]
- Networking & Security -> Installation and Upgrade -> Logical Network Settings -> Transport Zones -> Add
- Name: SEC Global Transport Zone
- Replication Mode: Hybrid
- Select clusters to be part of the Transport Zone: [sec-cluster]
- Networking & Security -> Installation and Upgrade -> Logical Network Settings -> Transport Zones -> Add
With the above complete, you should have a functioning NSX configuration thats looks a bit like the below, which is ready for you to create a set of logical networks for use by your vSphere and ultimately your vRealize configuration. I’ll pick that up in the next post in the series.

Leave a comment