

Welcome to Part 5 of my VVD on VxRail Breadcrumb Build Series
- Part 1: Preparation
- Part 2: Deploying the Management VxRail
- Part 3: Adjusting the Management VxRail
- Part 4: Installing NSX for Management VxRail
- Part 5: Logical Networking for Management VxRail
- Part 6: Deploying the Shared Edge/Compute VxRail
- Part 7: Adjusting the Shared Edge/Compute VxRail
- Part 8: Installing NSX for Shared Edge/Compute VxRail
- Part 9: Logical Networking for Shared Edge/Compute VxRail
- Part 10: Conclusion
Via previous posts we have gotten vSphere up and running and deployed NSX for the management VxRail. The next major task is to configure the logical networking, including the Load Balancer for the PSCs and the Edge Gateways and UDLR for North/South routing into the environment.
Warning: This is a very, very long post, so if you are following along then hang on to your hats and keep the coffee on standby as we spend a pretty long time in the networking weeds 🙂
Anything in the format [input_value] represents a value from your preparation that you should insert (without the square brackets of course)
Deploy the PSC LB
- Networking & Security -> NSX Edges -> Add
- Name and Desc
- Install Type: Edge Services Gateway
- Name : [psc-lb-edgename]
- Hostname: [psc-lb-virtual-fqdn]
- Deploy NSX Edges: Selected
- Enable High Availability: Selected
- Enable HA Logging: INFO
- Settings
- User Name: admin
- Password: [mgmt-nsx-edge-complex-password]
- Enable SSH access: Selected
- Enable FIPS Mode: Deselected
- Enable auto rule generation Selected
- Edge Control Level logging INFO
- Configure Deployment
- Appliance Size: Large
- Cluster/Resource Pool: [mgmt-cluster]
- Datastore: [mgmt-vsan-datastore]
- Add two appliances with same settings
- Configure Interfaces
- Nam: [psc-lb-edgename]
- Type: Internal
- Connected to: [mgmt-portgroup]
- Connectivity Status: Connected
- Primary IP Address: [psc-lb-virtual-ip]
- Subnet Prefix Length: [mgmt-prefix-length]
- MTU: 9000
- Send ICMP Redirect: Selected
- Firewall and HA
- Configure Firewall default policy: Selected
- Default Traffic Policy: Accept
- Logging: Disable
- vNIC: Any
- Declare Dead Time: 15
- Configure Gateway
- NSX Edges -> Double Click [psc-lb-edgename] -> Manage -> Routing -> Global Configuration -> Edit -> [mgmt-gateway] -> Publish
- Enable the Load Balancer
- NSX Edges -> Double Click [psc-lb-edgename] -> Manage -> Load Balancer -> Global Configuration -> Edit -> Enable Load Balancer -> OK
- Name and Desc
Create PSC App Profiles
- Networking & Security -> NSX Edges -> Double Click [psc-lb-edgename] -> Manage -> Load Balancer -> Application Profiles -> Add
- Profile1
- Name: psc-tcp
- Type: TCP
- Enable SSL Passthrough: Deselected
- Persistence: Source IP
- Expires in (Seconds): 60
- Profile 2
- Name: psc-https
- Type: HTTPS
- Enable SSL Passthrough: Selected
- Persistence: Source IP
- Expires in (Seconds): 60
- Profile1
Create PSC Server Pools
- Networking & Security -> NSX Edges -> Double Click [psc-lb-edgename] -> Manage -> Load Balancer -> Pools -> Add
- Pool 1
- Name: psc-https-443
- Algorithm: ROUND-ROBIN
- Monitors: default_tcp_monitor
- Member
- Name: psc01
- IP Address/VC Container: [mgmt-psc-ip]
- State: Enable
- Port
- Monitor Port: 443
- Weight: 1
- Member
- Name: psc02
- IP Address/VC Container: [sec-psc-ip]
- State: Enable
- Port
- Monitor Port: 443
- Weight: 1
- Pool 2
- Name: psc-tcp-389
- Algorithm: ROUND-ROBIN
- Monitors: default_tcp_monitor
- Member
- Name: psc01
- IP Address/VC Container: [mgmt-psc-ip]
- State: Enable
- Port
- Monitor Port : 389
- Weight: 1
- Member
- Name: psc02
- IP Address/VC Container: [sec-psc-ip]
- State: Enable
- Port
- Monitor Port: 389
- Weight: 1
Create PSC Virtual Servers
- Networking & Security -> NSX Edges -> Double Click [psc-lb-edgename] -> Manage -> Load Balancer -> Virtual Servers -> Add
- Virtual Server 1
- Enable Virtual Server: Selected
- Application Profile: psc-tcp
- Name: psc-tcp-389
- Description: 389-LDAP,2012-Control Interface,2014-RPC Port,2020- Authentication,636-SSL LDAP
- IP Address: [psc-lb-virtual-ip]
- Protocol: TCP
- Port: 389,636,2012,2014,2020
- Default Pool: psc-tcp-389
- Virtual Server 2
- Enable Virtual Server: Selected
- Application Profile: psc-https
- Name: psc-https-443
- Description: Data from the vSphere Web Client
- IP Address: [psc-lb-virtual-ip]
- Protocol: HTTPS
- Port: 443
- Default Pool: psc-https-443
Update DNS Records
- Update DNS Records for [psc-lb-virtual-fqdn] to point at[psc-lb-virtual-ip]
NSX Dynamic Routing
- Create a Universal Logical Switch for Use as the Transit Network
- Networking & Security -> Logical Switches -> New Logical Switch
- Name: Universal Transit Network
- Transport Zone: Mgmt Universal Transport Zone
- Replication Mode: Hybrid
- Networking & Security -> Logical Switches -> New Logical Switch
Deploy NSX Edge Devices for North-South Routing
- Networking & Security -> NSX Edges -> Add
- First ESG
- Name and Desc
- Install Type: Edge Services Gateway
- Name: [mgmt-esg01-edgename]
- Deploy NSX Edges: Selected
- Enable High Availability: Deselected
- Settings
- User Name: admin
- Password: [mgmt-nsx-edge-complex-password]
- Enable SSH access: Selected
- Enable FIPS Mode: Deselected
- Enable auto rule generation: Selected
- Edge Control Level logging: INFO
- Configure Deployment
- Appliance Size: Large
- Cluster/Resource Pool: [mgmt-cluster]
- Datastore: [mgmt-vsan-datastore]
- Configure Interfaces
- Name: Uplink01
- Type: Uplink
- Connected to: Uplink01
- Connectivity Status: Connected
- Primary IP Address: [mgmt-esg01-uplink01-ip]
- Subnet Prefix Length: [mgmt-uplink01-prefix-length]
- MTU: 9000
- Send ICMP Redirect: Selected
- Configure Interfaces
- Name: Uplink02
- Type: Uplink
- Connected to: Uplink02
- Connectivity Status: Connected
- Primary IP Address: [mgmt-esg01-uplink02-ip]
- Subnet Prefix Length: [mgmt-uplink02-prefix-length]
- MTU: 9000
- Send ICMP Redirect: Selected
- Configure Interfaces
- Name: Mgmt-UDLR
- Type: Internal
- Connected to: Universal Transit Network
- Connectivity Status: Connected
- Primary IP Address: [mgmt-esg01-utn-ip]
- Subnet Prefix Length: [mgmt-utn-prefix-length]
- MTU: 9000
- Send ICMP Redirect: Selected
- Default Gateway
- Deselect Configure Default Gateway
- Firewall and HA -> Next
- Name and Desc
- First ESG
- Networking & Security -> NSX Edges -> Add
- Second ESG
- Name and Desc
- Install Type: Edge Services Gateway
- Name: [mgmt-esg02-edgename]
- Deploy NSX Edges: Selected
- Enable High Availability: Deselected
- Settings
- User Name: admin
- Password: [mgmt-nsx-edge-complex-password]
- Enable SSH access: Selected
- Enable FIPS Mode: Deselected
- Enable auto rule generation: Selected
- Edge Control Level logging: INFO
- Configure Deployment
- Appliance Size: Large
- Cluster/Resource Pool: [mgmt-cluster]
- Datastore: [mgmt-vsan-datastore]
- Configure Interfaces
- Name: Uplink01
- Type: Uplink
- Connected to: Uplink01
- Connectivity Status: Connected
- Primary IP Address: [mgmt-esg02-uplink01-ip]
- Subnet Prefix Length: [mgmt-uplink01-prefix-length]
- MTU: 9000
- Send ICMP Redirect: Selected
- Configure Interfaces
- Name: Uplink02
- Type: Uplink
- Connected to: Uplink02
- Connectivity Status: Connected
- Primary IP Address: [mgmt-esg02-uplink02-ip]
- Subnet Prefix Length: [mgmt-uplink02-prefix-length]
- MTU: 9000
- Send ICMP Redirect: Selected
- Configure Interfaces
- Name: Mgmt-UDLR
- Type: Internal
- Connected to: Universal Transit Network
- Connectivity Status: Connected
- Primary IP Address: [mgmt-esg02-utn-ip]
- Subnet Prefix Length: [mgmt-utn-prefix-length]
- MTU: 9000
- Send ICMP Redirect: Selected
- Default Gateway
- Deselect Configure Default Gateway
- Firewall and HA -> Next
- Name and Desc
- Second ESG
Anti-Affinity rules for N/S Edges
- Select [mgmt-cluster] -> Configure -> VM/Host Rules -> Add
- Name: anti-affinity-rule-ecmpedges
- Enable rule: Selected
- Type: Separate Virtual Machine
- Add both [mgmt-esg01-edgename] and [mgmt-esg02-edgename]
Disable the N/S Edges Firewall Service
- Networking & Security -> NSX Edges -> Double Click [mgmt-esg01-edgename] -> Manage -> Firewall -> Stop -> Publish
- Repeat for [mgmt-esg02-edgename]
Enable and Configure Routing
In this section you configure static routes for networks that you intend to advertise from south of the Management UDLR. These networks are used for VXLAN traffic for management and workloads
- For [mgmt-esg01-edgename]
- Networking & Security -> NSX Edges -> Double Click Edge -> Manage -> Routing -> Global Configuration -> Start ECMP
- Dynamic Routing Configuration -> Edit -> Router ID = Uplink01 -> OK – >Publish
- Routing -> Static Routes – Add
- Network: [mgmt-cross-region-vxlan-network]/[mgmt-cross-region-vxlan-prefix-length]
- Next Hop: [mgmt-udlr-utn-uplink-ip]
- Interface: Mgmt-UDLR
- Admin Distance 210
- Routing -> Static Routes – Add
- Network:[mgmt-regiona-vxlan-network]/[mgmt-regiona-vxlan-prefix-length]
- Next Hop: [mgmt-udlr-utn-uplink-ip]
- Interface: Mgmt-UDLR
- Admin Distance 210
- Publish
- Routing -> BGP -> Edit
- Enable BGP: Selected
- Enable Graceful Restart: Selected
- Enable Default Originate: Deselected
- Local AS: [mgmt-esg01-local-as]
- BGP -> Add
- Neighbour 1 (TOR1)
- IP Address: [tor1-bgp-ip]
- Remote AS: [tor1-local-as]
- Weight: 60
- Keep Alive Time: 4
- Hold Down Time: 12
- Password: [tor1-bgp-password]
- Neighbour 2 (TOR2)
- IP Address: [tor2-bgp-ip]
- Remote AS : [tor2-local-as]
- Weight: 60
- Keep Alive Time: 4
- Hold Down Time: 12
- Password: [tor2-bgp-password]
- Neighbour 3 (UDLR)
- IP Address: [mgmt-udlr-bgp-protocol-ip]
- Remote AS: [mgmt-udlr-local-as]
- Weight: 60
- Keep Alive Time: 1
- Hold Down Time: 3
- Password: [mgmt-udlr-bgp-password]
- Neighbour 1 (TOR1)
- Publish
- Routing -> Route Redistribution -> Edit -> Select BGP -> OK
- Route Redistribution -> Add
- Prefix: Any
- Learner Protocol: BGP
- OSPF: Deselected
- Static Routes: Selected
- Connected: Selected
- Action: Permit
- Publish
- For [mgmt-esg02-edgename]
- Networking & Security -> NSX Edges -> Double Click Edge -> Manage -> Routing -> Global Configuration -> Start ECMP
- Dynamic Routing Configuration -> Edit -> Router ID = Uplink01 -> OK – >Publish
- Routing -> Static Routes – Add
- Network: [mgmt-cross-region-vxlan-network]/[mgmt-cross-region-vxlan-prefix-length]
- Next Hop: [mgmt-udlr-utn-uplink-ip]
- Interface: Mgmt-UDLR
- Admin Distance 210
- Routing -> Static Routes – Add
- Network: [mgmt-regiona-vxlan-network]/[mgmt-regiona-vxlan-prefix-length]
- Next Hop: [mgmt-udlr-utn-uplink-ip]
- Interface: Mgmt-UDLR
- Admin Distance 210
- Publish
- Routing -> BGP -> Edit
- Enable BGP: Selected
- Enable Graceful Restart: Selected
- Enable Default Originate: Deselected
- Local AS: [mgmt-esg02-local-as]
- BGP -> Add
- Neighbour 1 (TOR1)
- IP Address: [tor1-bgp-ip]
- Remote AS: [tor1-local-as]
- Weight: 60
- Keep Alive Time: 4
- Hold Down Time: 12
- Password: [tor1-bgp-password]
- Neighbour 2 (TOR2)
- IP Address: [tor2-bgp-ip]
- Remote AS : [tor2-local-as]
- Weight: 60
- Keep Alive Time: 4
- Hold Down Time: 12
- Password: [tor2-bgp-password]
- Neighbour 3 (UDLR)
- IP Address: [mgmt-udlr-bgp-protocol-ip]
- Remote AS: [mgmt-udlr-local-as]
- Weight: 60
- Keep Alive Time: 1
- Hold Down Time: 3
- Password: [mgmt-udlr-bgp-password]
- Neighbour 1 (TOR1)
- Publish
- Routing -> Route Redistribution -> Edit -> Select BGP -> OK
- Route Redistribution -> Add
- Prefix: Any
- Learner Protocol: BGP
- OSPF: Deselected
- Static Routes: Selected
- Connected: Selected
- Action: Permit
- Publish
Deploy Management UDLR
- Networking & Security -> NSX Edges -> Add
- Name and Description
- Universal Logical (Distributed) Router: Selected
- Name: Mgmt-UDLR
- Deploy Edge Appliance: Selected
- Enable High Availability: Selected
- Enable HA Logging: Selected
- Log Level: INFO
- Settings
- User Name: admin
- Password: [mgmt-nsx-edge-complex-password]
- Enable SSH access: Selected
- Enable FIPS Mode: Deselected
- Edge Control Level logging: INFO
- Configure Deployment
- Cluster/Resource Pool: [mgmt-cluster]
- Datastore: [mgmt-vsan-datastore]
- Add two appliances
- Configure Interfaces
- HA Interface Configuration -> Select -> [mgmt-portgroup]
- Configure Interfaces
- Name: Uplink
- Type: Uplink
- Connected to: Universal Transit Network
- Connectivity Status: Connected
- Primary IP Address: [mgmt-udlr-utn-uplink-ip]
- Subnet Prefix Length: [mgmt-utn-prefix-length]
- MTU: 9000
- Default Gateway
- Deselect Configure Default Gateway
- Finish
- Name and Description
- Enable SSH
- Double click Mgmt-UDLR -> Manage -> Firewall
- Add Rule
- Name: enableSSH
- Source: Any
- Destination: Any
- Service: SSH
- Action: Accept
- Add Rule
- Double click Mgmt-UDLR -> Manage -> Firewall
Configure UDLR for Dynamic Routing
- Networking & Security -> NSX Edges -> Double Click Mgmt-UDLR -> Manage -> Routing -> Global Configuration -> Routing Configuration -> Edit -> Enable ECMP -> OK
- Dynamic Routing Configuration -> Edit -> RouterID -> Select [Uplink] -> OK -> Publish
- Routing -> BGP -> Edit
- Enable BGP: Selected
- Enable Graceful Restart: Selected
- Local AS: [mgmt-udlr-local-as]
- Add Member for [mgmt-esg01-edgename]
- IP Address: [mgmt-esg01-utn-ip]
- Forwarding Address: [mgmt-udlr-utn-uplink-ip]
- Protocol Address: [mgmt-udlr-bgp-protocol-ip]
- Remote AS: [mgmt-esg01-local-as]
- Weight: 60
- Keep Alive Time: 1
- Hold Down Time: 3
- Password: [mgmt-esg01-bgp-password]
- Add Member for [mgmt-esg02-edgename]
- IP Address: [mgmt-esg02-udlr-ip]
- Forwarding Address: [mgmt-udlr-utn-uplink-ip]
- Protocol Address: [mgmt-udlr-bgp-protocol-ip]
- Remote AS: [mgmt-esg02-local-as]
- Weight: 60
Keep Alive Time: 1
Hold Down Time: 3
Password: [mgmt-esg02-bgp-password]
- Publish
- Route Redistribution -> Edit
- OSPF: Deselected
- BGP: Selected
- Route Redistribution -> Route Redistribution Table -> OSPF Entry -> Edit
- Learner Protocol: BGP
- Publish
Exclude Management vCenter from Firewall
- Networking & Security -> Firewall Settings -> Exclusion List -> Add -> Add [mgmt-vcenter-vmname] ->OK
Create IP Sets for Components of the Management Cluster
- Networking & Security -> Groups and Tags -> IP Sets
- Create IP Sets as follows
- PSCs: [mgmt-psc-ip],[sec-psc-ip],[psc-lb-virtual-ip]
- vCenters: [mgmt-vcenter-ip],[sec-vcenter-ip]
- vRA-App: [vra_appliance01-ip],[vra_appliance03-ip],[vra_appliance03-ip]
- vRA-IaaS: [vra-dem01-ip],[vra-dem02-ip],[vra-manager01-ip],[vra-manager02-ip],[vra-web01-ip,[vra-web02-ip]
- vRA-Agents: [vra-agent01-ip],[vra-agent02-ip]
- vRB: [vrb-ip]
- vRB-Collectors: [vrb-collector01-ip]
- vDP: [vdp-ip]
- vROPS: [vrops-ip]
- vROPS-Collectors: [vrops-collector01-ip]
- vRLI: [vrli-ip]
- vRLCM: [vrlcm-ip]
- UMDS: [update-manager-ip]
- VXRM: [vxrm-ip]
- SDDC: [mgmt-networks],[mgmt-vxlan-network]
- Administrators: [administrator-network]
Create NSX Security Groups
- Networking & Security -> Groups and Tags -> Security Groups
- Create security groups with their corresponding IP sets as members
- PSCs
- vCenters
- vRA-App
- vRA-IaaS
- vRA-Agents
- vRB
- vRB-Collectors
- vDP
- vROPS
- vROPS-Collectors
- vRLI
- vRLCM
- UMDS
- VXRM
- SDDC
- Administrators
- Create security groups with the listed security groups as members
- Windows Servers: vRA-IaaS, vRA-Agents
- VMware Appliances: PSCs, vCenters , vRA-App, vRB, vRB-Collectors, vDP, vROP, vROPS-Collectors, vRLI, vRLCM
Create Distributed Firewall Rules
- Networking & Security -> Firewall -> Add Section
- Name: VMware Management Services
- Mark for Universal Synchronization
- Add Rule
- Name: Allow SSH to admins
- Source: Administrators
- Destination: VMware Appliances, UMDS
- Service: SSH
- Publish
- Add Rule
- Name: Allow SDDC to any
- Source: SDDC
- Destination: Any
- Service: Any
- Publish
- Add Rule
- Name: Allow PSC to admins
- Source: Administrators
- Destination: PSCs
- Service: HTTPS
- Publish
- Add Rule
- Name: Allow SSH to admins
- Source: Administrators
- Destination: VMware Appliances, UMDS, VXRM
- Service: HTTPS
- Publish
- Add Rule
- Name: Allow VAMI to admins
- Source: Administrators
- Destination: VMware Appliances
- Service: TCP:5480
- Publish
- Add Rule
- Name: Allow VxRail UI to admins
- Source: Administrators
- Destination: VXRM
- Service: HTTPS
- Publish
- Add Rule
- Name: Allow vRA Portal to end users
- Source: Any
- Destination: vRA-App, vRA-IaaS, vRB
- Service: HTTP, HTTPS
- Publish
- Add Rule
- Name: Allow vRA Console Proxy to end users
- Source: Any
- Destination: vRA-App
- Service: TCP:8444
- Publish
- Add Rule
- Name: Allow RDP to admins
- Source: Administrators
- Destination: Windows Servers
- Service: RDP
- Publish
- Add Rule
- Name: Allow Orchestrator to admins
- Source: Administrators
- Destination: vRA-App
- Service: TCP:8281,8283
- Publish
- Add Rule
- Name: Allow vRB Data Collector to admins
- Source: Administrators
- Destination: vRB-Collectors
- Service: HTTP, HTTPS
- Publish
- Add Rule
- Name: Allow vROPs to admins
- Source: Administrators
- Destination: vROPs, vROPS-Collectors
- Service: HTTP, HTTPS
- Publish
- Add Rule
- Name: Allow vRLI to admins
- Source: Administrators
- Destination: vRLI
- Service: HTTP, HTTPS
- Publish
- Add Rule
- Name: Allow VDP to administrator
- Source: Administrators
- Destination: VMware Appliances
- Service: TCP:8543
- Publish
- Change Rule **
- Section: Default Section Layer3
- Action: Block
- Publish
** Double check your homework before you do this step. If you got missed an earlier step or put in the wrong details for IP Sets and Security Groups could lock yourself out from all of your hard work. Just in case you do get stuck, check out this ProTip https://feardamhan.com/2019/02/04/pro-tip-nsx-distributed-firewall-rule-locked-you-out-of-vcenter/
Deploy Application Virtual Networks
- Networking & Security -> Logical Switches
- New Logical Switch
- Name: Mgmt-CrossRegion-VXLAN
- Transport Zone: Mgmt Universal Transport Zone
- Replication Mode:Hybrid
- New Logical Switch
- Name: Mgmt-RegionA-VXLAN
- Transport Zone: Mgmt Universal Transport Zone
- Replication Mode: Hybrid
- Logical Switches -> Select Mgmt-CrossRegion-VXLAN -> Actions -> Connect Edge -> Select Mgmt-UDLR -> Next -> Edit NSX Edge Interface
- Name: Mgmt-CrossRegion-VXLAN
- Type: Internal
- Connected To: Mgmt-CrossRegion-VXLAN
- Connectivity Status: Connected
- Primary IP Address: [mgmt-udlr-cross-region-vxlan-ip]
- Subnet Prefix Length: [mgmt-cross-region-vxlan-prefix-length]
- Finish
- Logical Switches -> Select Mgmt-RegionA-VXLAN -> Actions -> Connect Edge -> Select Mgmt-UDLR -> Next -> Edit NSX Edge Interface
- Name: Mgmt-RegionA-VXLAN
- Type: Internal
- Connected To: Mgmt-RegionA-VXLAN
- Connectivity Status: Connected
- Primary IP Address: [mgmt-udlr-regiona-vxlan-ip]
- Subnet Prefix Length: [mgmt-regiona-vxlan-prefix-length]
- Finish
- MTU for the Logical Switches
- Networking & Security -> NSX Edges -> Double Click Mgmt-UDLR -> Manage -> Settings -> Interfaces
- MTU Mgmt-RegionA-VXLAN: 9000
- MTU Mgmt-CrossRegion-VXLAN: 9000
- New Logical Switch
Deploy the Management NSX Load Balancer
- Networking & Security -> NSX Edges -> Add
- Name and Desc
- Install Type: Edge Services Gateway
- Name: [mgmt-lb-edgename]
- Hostname: [mgmt-lb-virutal-fqdn]
- Deploy NSX Edges: Selected
- Enable High Availability: Selected
- Enable HA Logging: INFO
- Name and Desc
- Settings
- User Name: admin
- Password: [mgmt-nsx-edge-complex-password]
- Enable SSH access: Selected
- Enable FIPS Mode: Deselected
- Enable auto rule generation: Selected
- Edge Control Level logging: INFO
- Configure Deployment
- Appliance Size: Large
- Cluster/Resource Pool: [mgmt-cluster]
- Datastore: [mgmt-vsan-datastore]
- Add two appliances with same settings
- Configure Interfaces
- Name: OneArmLB
- Type: Internal
- Connected to: Mgmt-CrossRegion-VXLAN
- Connectivity Status: Connected
- Primary IP Address : [mgmt-lb-virtual-ip]
- Subnet Prefix Length: [mgmt-cross-region-vxlan-prefix-length]
- MTU: 9000
- Send ICMP Redirect: Selected
- Firewall and HA
- Configure Firewall default policy: Selected
- Default Traffic Policy: Accept
- Logging: Disable
- vNIC: Any
- Declare Dead Time: 15
- Configure Gateway
- NSX Edges -> Double Click [mgmt-lb-edgename] -> Manage -> Routing -> Global Configuration -> Edit -> [mgmt-udlr-cross-region-vxlan-ip] -> Publish
- Enable the Load Balancer
- NSX Edges -> Double Click [mgmt-lb-edgename] -> Manage -> Load Balancer -> Global Configuration -> Edit -> Enable Load Balancer ->OK
Err….you still with me?
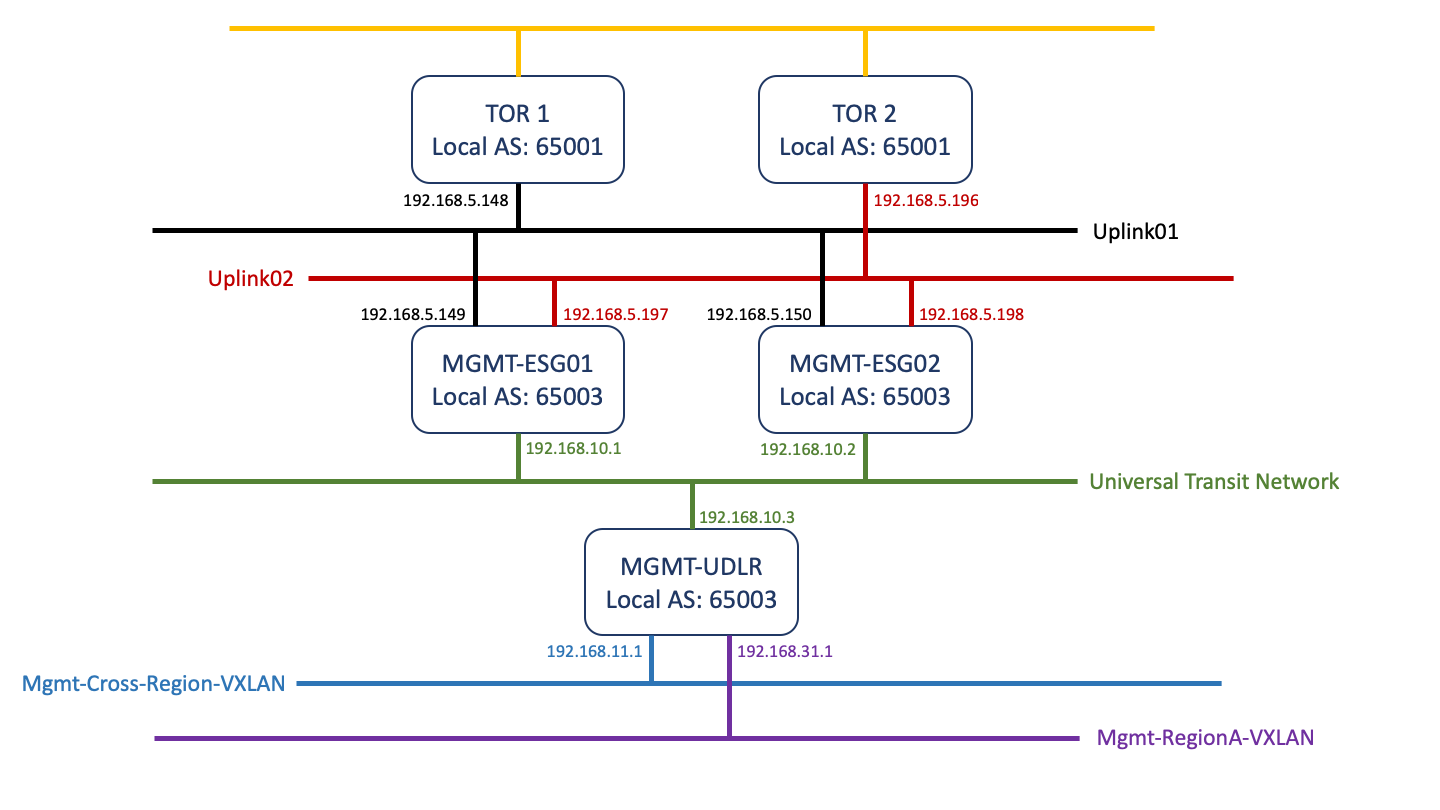
If you got through all of the above and haven’t overdosed on coffee, then kudos to you! You should now have:
- a load balanced PSC
- a load balancer for the management components
- a configured firewall on the Management VxRail
- a BGP network that looks a little something like the below!
And thats a wrap for the Management VxRail Virtual Infrastructure Implementation. Next up we do the same thing for the Shared Edge / Compute (aka Workload) VxRail.

Leave a comment