
Welcome to Part 2 of my VVD on VxRail Breadcrumb Build Series
- Part 1: Preparation
- Part 2: Deploying the Management VxRail
- Part 3: Adjusting the Management VxRail
- Part 4: Installing NSX for Management VxRail
- Part 5: Logical Networking for Management VxRail
- Part 6: Deploying the Shared Edge/Compute VxRail
- Part 7: Adjusting the Shared Edge/Compute VxRail
- Part 8: Installing NSX for Shared Edge/Compute VxRail
- Part 9: Logical Networking for Shared Edge/Compute VxRail
- Part 10: Conclusion
With all the relevant detail gathered, the next step is to deploy the first of two VxRails. This Rail, with a little tweaking will become the management vCenter/cluster which will host all of the vSphere components (including the external vCenter and second PSC for the Shared / Edge compute cluster). Eventually, it will hold the vRealize Automation stack components that provide your cloud service.
Anything in the format [input_value] represents a value from your preparation that you should insert (without the square brackets of course)
Factory Reset (as Required)
This only needs to be done if the Rail was previously used and/or you want to wipe the nodes clean / install and updated image from the Local SD card on each host.
- Connect to iDRAC
- Launch Virtual Console
- Menu -> Next Boot -> Local SD Card
- Power -> Warm Reset
- At SD Menu
- 1 (Factory Reset)
- Y Continue
- Reboot
VxRail Bring Up with non-native VLAN (optional)
If the management network used for ESXi hosts and VxRail Manager is not the native VLAN on your switches, then you need to do a little bit of prep before these components will be able to talk to each other when running the VxRail Deployment wizard. If this is for you , perform the following on each ESXi Node (replacing the IPs/VLANs accordingly)
- Enable Shell (found this to be done already)
- F2 – > Login as root / Passw0rd!
- Troubleshooting Options -> Enter
- Enable ESXi Shell -> Enable ->ESC
- Set VLANs
- Alt-F1 to access Shell
- Login root / Passw0rd!
- Execute
- esxcli network vswitch standard portgroup set -p “Management Network” -v [mgmt-vlan]
- esxcli network vswitch standard portgroup set -p “VM Network” -v [mgmt-vLAN]
- /etc/init.d/loudmouth restart
- Verify VLAN ID
- esxcli network vswitch standard port group list
- Set IP/VLAN on VxRail Manager
- Login with root / Passw0rd!
- Open Xterm (replace IP info accordingly)
- systemctl status vmware-marvin
- systemctl stop vmware-marvin
- ip addr add [mgmt-vxrm-ip/mgmt-prefix-length] brd [mgmt-broadcast] dev eth0
- ip addr del 192.168.10.200/24 brd dev eth0
- ip route add default via [mgmt-gateway]
- ip link set eth0 down
- ip link set eth0 up
- ip a
- /opt/vmware/share/vami/vami_set_network eth0 STATICV4 [mgmt-vxrm-ip] [mgmt-mask] [mgmt-gateway]
- systemctl restart vmware-marvin
- sytemctl restart vmware-loudmouth
- systemctl restart network
Enable SSH on Hosts
You can do this now or later, but I find it hand for restarting loudmouth services etc should the initial discover of nodes not show them all
- Either
- ESXi Node DCUI -> Manage -> Services -> Enable SSH service
- Or
- VC -> Configure -> Security Profile -> Services -> EnableSSH service (start with host)
Deploy VxRail
This is where the first really cool bit of automation gets used.
- Browse to [mgmt-vxrm-fqdn] -> Get Started -> Accept
- Discover 4 Nodes
- Confirm the list of Nodes
- Choose Step-By-Step
- System
- Globals
- NTP: [ntp-ip]
- NIC Configuration [use default]
- Networks
- Top Level Domain
- Domain: [ad-domain]
- ESXi Host Names
- Prefix: [mgmt-esxi-hostname-prefix]
- ESXi Host IP Pool
- Starting IP: [mgmt-esxi-ip-range-start]
- Ending IP: [mgmt-esxi-ip-range-end]
- vCenter Server
- Hostname: [mgmt-vcenter-hostname]
- IP Address: [mgmt-vcenter-ip]
- Platform Services Controller
- Hostname: [mgmt-psc-hostname]
- IP Address: [mgmt-psc-ip]
- VxRail Manager
- Hostname: [mgmt-vxrm-hostname]
- IP Address: [mgmt-vxrm-ip]
- Networking
- Subnet Mask: [mgmt-mask]
- Gateway: [mgmt-gateway]
- DNS: [dns-server]
- Top Level Domain
- vSphere vMotion
- Starting IP: [mgmt-vmotion-ip-range-start]
- Ending IP: [mgmt-vmotion-ip-range-end]
- Subnet Mask: [mgmt-vmotion-mask]
- VLAN ID: [mgmt-vmotion-vlan]
- vSAN
- Starting IP: [mgmt-vsan-ip-range-start]
- Ending IP: [mgmt-vsan-ip-range-end]
- Subnet Mask: [mgmt-vsan-mask]
- VLAN ID: [mgmt-vsan-vlan]
- VM Networks
- VM Network Name: [mgmt-vmnetwork-name]
- VLAN ID: [mgmt-vmnetwork-vlan]
- Solutions
- None required. Specify as needed
- Accounts
- Use the same credentials for all virtual appliance accounts: Selected
- vCenter Server Management Username: admin
- Shared Password: [mgmt-shared-password]
- ESXi Root Password: [mgmt-esxi-root-password]
- Globals
- Validate
- Deploy
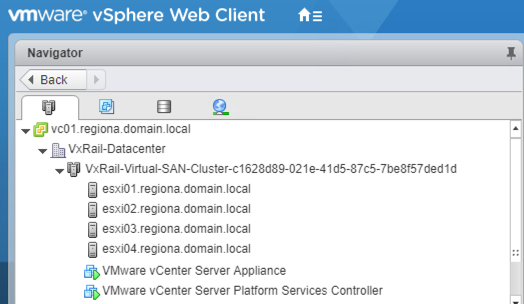
At this point you should have a fully built VxRail, with vCenter, PSC, Cluster, VSAN datastore and VDS. The wizard also performs a bunch of post deployment cleanup of VxRail wizard artefacts. Next step is to tweak the VxRail and make it ready to be the management vCenter from a VVD perspective.