

Ok, so this the last bit of creating the customization detail for a new VM. In this case, we will show how to do it for a SQL server. I’ll add more posts asynchronously that shows how to do standard member servers as well as domain controllers
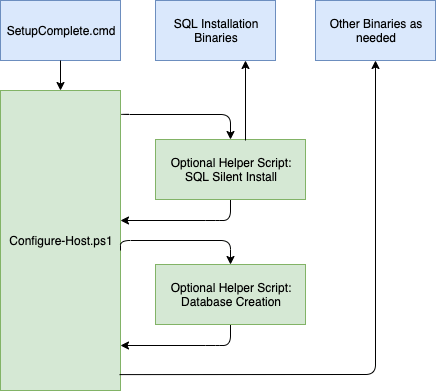
This is the part of the overall process that this post is focused on
PowerShell Script
This is the complete function that:
- Customizes the autounattend.xml (covered in previous post in series)
- Creates the Configure-Host.ps1 file
- Includes helper scripts
- Builds the answerfiles-iso
- Uploads the ISO to a vSphere Datastore
As you read the below, you will see a series of ‘Add-Content’ commands. Effectively, we are using these to construct a bespoke Configure-Host.ps1 file that will be included on the answer files ISO we build for the VM. Things to note:
- In some cases we are creating lines where we want values from the script to be passed into the file.
- In other cases we are actually creating variables on the remote machine to be used during execution
Function createSQLConfigISO
{
    param(
    [parameter(mandatory=$true)]
    [array]$machineObject,
    [parameter(mandatory=$true)]
    [array]$sharedDetails,
    [parameter(mandatory=$true)]
    [array]$domainDetails
    )
    #Create necessary folders
    LogMessage "Creating Temporary Folders"
    New-Item -ItemType Directory -Path $buildfolder | Out-File $logFile -encoding ASCII -append
    New-Item -ItemType Directory -Path "$buildfolder\SupportingFiles" | Out-File $logFile -encoding ASCII -append
    New-Item -ItemType File -Path "$buildfolder\SupportingFiles\configure-host.ps1" | Out-File $logFile -encoding ASCII -append

    LogMessage "Creating and Injecting Windows Unattended Installation File"

    #Set destination iso file name
    $DestinationAnswerFilesIsoPath = "$isosPath\$environment-$($machineObject.machinename)-answerfiles.iso"

    #Read in the template AutoUnattend.xml for SQL, replace key strings with values from JSON inputs and save to working folder
    $AutoUnattendXml = Get-Content $sqlTemplateXml
    $AutoUnattendXml | ForEach-Object { $_ `
        -replace '<!--REPLACE WITH PRODUCTKEY-->',$commonJSON.isoGeneration.productKey `
        -replace '<!--REPLACE WITH MACHINENAME-->',$machineObject.machinename `
        -replace '<!--REPLACE WITH IPCIDR-->', $machineObject.ipCidr `
        -replace '<!--REPLACE WITH GATEWAY-->',$machineObject.gateway `
        -replace '<!--REPLACE WITH ADMINISTRATOR PASSWORD-->',$commonJson.environment.commonPassword `
        -replace '<!--REPLACE WITH CHILD DOMAIN-->',$sharedDetails.activeDirectory.childDomain `
        -replace '<!--REPLACE WITH ROOT DOMAIN-->',$commonJSON.activeDirectory.rootDomai `
    } | Set-Content "$buildfolder\SupportingFiles\autounattend.xml"

    #Read in template SQL installation answer file, replace key strings and save to working flder
    LogMessage "Creating and Injecting files required for SQL Installation"
    $domainNameParts = $commonJSON.activeDirectory.rootDomain -split "\."
    $netBIOSName = $domainNameParts[0]
    $configIni = Get-Content $SQLConfigurationFilePath
    $configIni | ForEach-Object { $_ `
        -replace '<!--REPLACE WITH ADMINISTRATOR PASSWORD-->',$commonJson.environment.commonPassword `
        -replace '<!--REPLACE WITH ROOT NETBIOS NAME-->',$netBIOSName `
    } | Set-Content "$buildfolder\SupportingFiles\sql-configuration-file.ini"

    #Copy pre-create SQL Database creation script to working folder
    copy-item $SQLDatabaseScriptPath -Destination "$buildfolder\SupportingFiles"

    #Create configure-host.ps1 file content
    LogMessage "Creating Post Installation Scripts"

    #Start transcript on VM being built, to ease troubleshooting
    Add-Content "$buildfolder\SupportingFiles\configure-host.ps1" 'Start-Transcript "C:\Windows\Setup\Scripts\transcript.txt"'

    #Set desired DNS Servers
    Add-Content "$buildfolder\SupportingFiles\configure-host.ps1" "netsh interface ip add dns Ethernet0 $($machineObject.dnsServer1)"
    Add-Content "$buildfolder\SupportingFiles\configure-host.ps1" "netsh interface ip add dns Ethernet0 $($machineObject.dnsServer2) index=2"

    #Set desired timezone (in this case hard coded)
    Add-Content "$buildfolder\SupportingFiles\configure-host.ps1" 'tzutil /s "GMT Standard Time"'

    #Build up details to create a powershell credential needed to add server to domain
    $rootAdministrator = 'Administrator@'+$commonJSON.activeDirectory.rootDomain
    $newline = '$lab_username = "'+$rootAdministrator+'"'
    Add-Content "$buildfolder\SupportingFiles\configure-host.ps1" $newline
    $newline = '$lab_plain_password = "'+$commonJson.environment.commonPassword+'"'
    Add-Content "$buildfolder\SupportingFiles\configure-host.ps1" $newline
    Add-Content "$buildfolder\SupportingFiles\configure-host.ps1" '$lab_password = ConvertTo-SecureString -String $lab_plain_password -AsPlainText -Force'
    Add-Content "$buildfolder\SupportingFiles\configure-host.ps1" '$lab_credentials = New-Object System.Management.Automation.PSCredential ($lab_username, $lab_password)'

    #Add server to domain
    $newline = 'Add-Computer -DomainName '+$($commonJSON.activeDirectory.rootDomain)+' -Credential $lab_credentials'
    Add-Content "$buildfolder\SupportingFiles\configure-host.ps1" $newline

    #Copy windows source files to VM and set policy
    Add-Content "$buildfolder\SupportingFiles\configure-host.ps1" 'mkdir C:\sources\sxs'
    Add-Content "$buildfolder\SupportingFiles\configure-host.ps1" 'xcopy D:\sources\sxs C:\sources\sxs /e /v /c'
    Add-Content "$buildfolder\SupportingFiles\configure-host.ps1" 'New-Item -Path "HKLM:\SOFTWARE\Microsoft\Windows\CurrentVersion\Policies\Servicing"'
    Add-Content "$buildfolder\SupportingFiles\configure-host.ps1" 'set-ItemProperty -Path "HKLM:\SOFTWARE\Microsoft\Windows\CurrentVersion\Policies\Servicing\" -Name "LocalSourcePath" -value "c:\sources\sxs"'

    #Set powershell parameters
    Add-Content "$buildfolder\SupportingFiles\configure-host.ps1" 'Set-ExecutionPolicy Unrestricted'

    #Supress UAC
    Add-Content "$buildfolder\SupportingFiles\configure-host.ps1" 'Set-ItemProperty -Path "HKLM:\Software\Microsoft\Windows\CurrentVersion\Policies\System" -Name "EnableLUA" -Value "0"'

    #Disable IPv6
    Add-Content "$buildfolder\SupportingFiles\configure-host.ps1" 'Set-ItemProperty -Path "HKLM:\System\CurrentControlSet\Services\Tcpip6\Parameters" -Name "DisabledComponents" -Value 0xff'

    #Add specific user as admin (as required)
    $domainNameParts = $commonJSON.activeDirectory.rootDomain -split "\."
    $netBIOSName = $domainNameParts[0]
    Add-Content "$buildfolder\SupportingFiles\configure-host.ps1" "net localgroup administrators $netBIOSName\special-admin /add"
    Add-Content "$buildfolder\SupportingFiles\configure-host.ps1" '$RegPath = "HKLM:\SOFTWARE\Microsoft\Windows NT\CurrentVersion\Winlogon"'

    #Configure said admin to autologin (as required)
    $newline = '$DefaultDomainName = "'+$netBIOSName+'"'
    Add-Content "$buildfolder\SupportingFiles\configure-host.ps1" $newline
    $newline = '$DefaultUsername = "'+$netBIOSName+'\special-admin"'
    Add-Content "$buildfolder\SupportingFiles\configure-host.ps1" $newline
    $newline = '$DefaultPassword = "'+$commonJSON.activeDirectory.rootDefaultAdministratorPassword+'"'
    Add-Content "$buildfolder\SupportingFiles\configure-host.ps1" $newline
    Add-Content "$buildfolder\SupportingFiles\configure-host.ps1" 'New-ItemProperty $RegPath -Name "AutoAdminLogon" -Value "1" -type String '
    Add-Content "$buildfolder\SupportingFiles\configure-host.ps1" 'New-ItemProperty $RegPath -Name "DefaultDomainName" -Value "$DefaultDomainName" -type String'
    Add-Content "$buildfolder\SupportingFiles\configure-host.ps1" 'New-ItemProperty $RegPath -Name "DefaultUsername" -Value "$DefaultUsername" -type String'
    Add-Content "$buildfolder\SupportingFiles\configure-host.ps1" 'New-ItemProperty $RegPath -Name "DefaultPassword" -Value "$DefaultPassword" -type String'

    #Disable IE Enhanced Security
    Add-Content "$buildfolder\SupportingFiles\configure-host.ps1" '$AdminKey = "HKLM:\SOFTWARE\Microsoft\Active Setup\Installed Components\{A509B1A7-37EF-4b3f-8CFC-4F3A74704073}"'
    Add-Content "$buildfolder\SupportingFiles\configure-host.ps1" '$UserKey = "HKLM:\SOFTWARE\Microsoft\Active Setup\Installed Components\{A509B1A8-37EF-4b3f-8CFC-4F3A74704073}"'
    Add-Content "$buildfolder\SupportingFiles\configure-host.ps1" 'Set-ItemProperty -Path $AdminKey -Name "IsInstalled" -Value 0 -Force'
    Add-Content "$buildfolder\SupportingFiles\configure-host.ps1" 'Set-ItemProperty -Path $UserKey -Name "IsInstalled" -Value 0 -Force'

    #Enable RDP
    Add-Content "$buildfolder\SupportingFiles\configure-host.ps1" 'New-Item -Path "HKLM:\Software\Microsoft\Windows\CurrentVersion\Policies\System\CredSSP"'
    Add-Content "$buildfolder\SupportingFiles\configure-host.ps1" 'New-Item -Path "HKLM:\Software\Microsoft\Windows\CurrentVersion\Policies\System\CredSSP\Parameters"'
    Add-Content "$buildfolder\SupportingFiles\configure-host.ps1" 'New-ItemProperty -path "HKLM:\Software\Microsoft\Windows\CurrentVersion\Policies\System\CredSSP\Parameters" -Name "AllowEncryptionOracle" -Value "2" -type DWORD'
    Add-Content "$buildfolder\SupportingFiles\configure-host.ps1" 'New-ItemProperty -Path "HKLM:\System\CurrentControlSet\Control\Terminal Server" -Name "fDenyTSConnections" -Value 0 -PropertyType dword -Force'
    Add-Content "$buildfolder\SupportingFiles\configure-host.ps1" 'Set-ItemProperty -Path "HKLM:\SYSTEM\CurrentControlSet\Control\Terminal Server\WinStations\RDP-Tcp\" -Name "UserAuthentication" -Value 0'

    #Install SQL
    Add-Content "$buildfolder\SupportingFiles\configure-host.ps1" 'D:\Software\SQL-Install\setup.exe /ConfigurationFile=E:\sql-configuration-file.ini'

    #Create Database
    Add-Content "$buildfolder\SupportingFiles\configure-host.ps1" '$con = New-Object Data.SqlClient.SqlConnection;'
    Add-Content "$buildfolder\SupportingFiles\configure-host.ps1" '$con.ConnectionString = "Data Source=.;Initial Catalog=master;UID=sa;PWD=VMw@re1!";'
    Add-Content "$buildfolder\SupportingFiles\configure-host.ps1" '$con.Open();'
    Add-Content "$buildfolder\SupportingFiles\configure-host.ps1" '$sql = get-content E:\sql-create-database-ps.txt'
    Add-Content "$buildfolder\SupportingFiles\configure-host.ps1" '$cmd = New-Object Data.SqlClient.SqlCommand $sql, $con;'
    Add-Content "$buildfolder\SupportingFiles\configure-host.ps1" '$cmd.ExecuteNonQuery();'

    #Install SQL Management Studio
    Add-Content "$buildfolder\SupportingFiles\configure-host.ps1" 'Start-Process "D:\Software\SQL-Install\SSMS-Setup-ENU.exe" -args "/Install /Passive /Norestart" -wait'

    #Configure MSDTC
    Add-Content "$buildfolder\SupportingFiles\configure-host.ps1" '$MSTDCKey = "HKLM:\SOFTWARE\Microsoft\MSDTC\Security"'
    Add-Content "$buildfolder\SupportingFiles\configure-host.ps1" 'Set-ItemProperty -Path $MSTDCKey -Name "NetworkDtcAccess" -Value 1 -Force'
    Add-Content "$buildfolder\SupportingFiles\configure-host.ps1" 'Set-ItemProperty -Path $MSTDCKey -Name "NetworkDtcAccessAdmin" -Value 1 -Force'
    Add-Content "$buildfolder\SupportingFiles\configure-host.ps1" 'Set-ItemProperty -Path $MSTDCKey -Name "NetworkDtcAccessClients" -Value 1 -Force'
    Add-Content "$buildfolder\SupportingFiles\configure-host.ps1" 'Set-ItemProperty -Path $MSTDCKey -Name "NetworkDtcAccessTransactions" -Value 1 -Force'
    Add-Content "$buildfolder\SupportingFiles\configure-host.ps1" 'Set-ItemProperty -Path $MSTDCKey -Name "NetworkDtcAccessInbound" -Value 1 -Force'
    Add-Content "$buildfolder\SupportingFiles\configure-host.ps1" 'Set-ItemProperty -Path $MSTDCKey -Name "NetworkDtcAccessOutbound" -Value 1 -Force'

    #Enable PS Remoting to allow management via remote machines
    Add-Content "$buildfolder\SupportingFiles\configure-host.ps1" 'Enable-PSRemoting -Force'
    Add-Content "$buildfolder\SupportingFiles\configure-host.ps1" 'Set-Item wsman:\localhost\client\trustedhosts * -Force'

    #Remove the SetupComplete.cmd file
    Add-Content "$buildfolder\SupportingFiles\configure-host.ps1" 'Remove-Item C:\Windows\Setup\Scripts\SetupComplete.cmd -force'

    #Stop Transcript
    Add-Content "$buildfolder\SupportingFiles\configure-host.ps1" 'Stop-Transcript'

    #Final Reboot
    Add-Content "$buildfolder\SupportingFiles\configure-host.ps1" 'Restart-Computer -force'
    LogMessage "Creating Configuration ISO for $environment-$($machineObject.machinename)-answerfiles.iso for environment $environment"

    #Create Answerfiles ISO
    $data = '2#p0,e,b"{0}"#pEF,e,b"{1}"' -f $etfsboot, $efisys
    start-process $oscdimg -args @("-bootdata:$data",'-u2','-udfver102', "$buildfolder\SupportingFiles", $DestinationAnswerFilesIsoPath) -wait -nonewwindow -RedirectStandardError Null1 -RedirectStandardOutput Null2

    #Upload ISO (separate powershell function not shown here)
    uploadISO Internal $domainDetails $commonJSON.environment.type $sharedDetails $DestinationAnswerFilesIsoPath
}
Supporting Helper Scripts
In this case, the SQL install uses a few helper scripts
SQL Installation Template
Again, this is a template file with some key strings that the PowerShell will edit/replace before saving for inclusion in the answer files ISO
;SQL Server 2017 Configuration File
[OPTIONS]
IACCEPTSQLSERVERLICENSETERMS="True"
SAPWD="<!--REPLACE WITH ADMINISTRATOR PASSWORD-->"

; By specifying this parameter and accepting Microsoft R Open and Microsoft R Server terms, you acknowledge that you have read and understood the terms of use.

IACCEPTPYTHONLICENSETERMS="False"

; Specifies a Setup work flow, like INSTALL, UNINSTALL, or UPGRADE. This is a required parameter.

ACTION="Install"

; Specifies that SQL Server Setup should not display the privacy statement when ran from the command line.

SUPPRESSPRIVACYSTATEMENTNOTICE="False"

; By specifying this parameter and accepting Microsoft R Open and Microsoft R Server terms, you acknowledge that you have read and understood the terms of use.

IACCEPTROPENLICENSETERMS="False"

; Use the /ENU parameter to install the English version of SQL Server on your localized Windows operating system.

ENU="True"

; Setup will not display any user interface.

QUIET="False"

; Setup will display progress only, without any user interaction.

QUIETSIMPLE="True"

; Parameter that controls the user interface behavior. Valid values are Normal for the full UI,AutoAdvance for a simplied UI, and EnableUIOnServerCore for bypassing Server Core setup GUI block.

;UIMODE="Normal"

; Specify whether SQL Server Setup should discover and include product updates. The valid values are True and False or 1 and 0. By default SQL Server Setup will include updates that are found.

UpdateEnabled="True"

; If this parameter is provided, then this computer will use Microsoft Update to check for updates.

USEMICROSOFTUPDATE="False"

; Specify the location where SQL Server Setup will obtain product updates. The valid values are "MU" to search Microsoft Update, a valid folder path, a relative path such as .\MyUpdates or a UNC share. By default SQL Server Setup will search Microsoft Update or a Windows Update service through the Window Server Update Services.

UpdateSource="MU"

; Specifies features to install, uninstall, or upgrade. The list of top-level features include SQL, AS, IS, MDS, and Tools. The SQL feature will install the Database Engine, Replication, Full-Text, and Data Quality Services (DQS) server. The Tools feature will install shared components.

FEATURES=SQLENGINE

; Displays the command line parameters usage

HELP="False"

; Specifies that the detailed Setup log should be piped to the console.

INDICATEPROGRESS="False"

; Specifies that Setup should install into WOW64. This command line argument is not supported on an IA64 or a 32-bit system.

X86="False"

; Specify a default or named instance. MSSQLSERVER is the default instance for non-Express editions and SQLExpress for Express editions. This parameter is required when installing the SQL Server Database Engine (SQL), or Analysis Services (AS).

INSTANCENAME="MSSQLSERVER"

; Specify the root installation directory for shared components.  This directory remains unchanged after shared components are already installed.

INSTALLSHAREDDIR="C:\Program Files\Microsoft SQL Server"

; Specify the root installation directory for the WOW64 shared components.  This directory remains unchanged after WOW64 shared components are already installed.

INSTALLSHAREDWOWDIR="C:\Program Files (x86)\Microsoft SQL Server"

; Specify the Instance ID for the SQL Server features you have specified. SQL Server directory structure, registry structure, and service names will incorporate the instance ID of the SQL Server instance.

INSTANCEID="MSSQLSERVER"

; TelemetryUserNameConfigDescription

SQLTELSVCACCT="NT Service\SQLTELEMETRY"

; TelemetryStartupConfigDescription

SQLTELSVCSTARTUPTYPE="Automatic"

; Specify the installation directory.

INSTANCEDIR="C:\Program Files\Microsoft SQL Server"

; Agent account name

AGTSVCACCOUNT="NT Service\SQLSERVERAGENT"

; Auto-start service after installation.

AGTSVCSTARTUPTYPE="Manual"

; CM brick TCP communication port

COMMFABRICPORT="0"

; How matrix will use private networks

COMMFABRICNETWORKLEVEL="0"

; How inter brick communication will be protected

COMMFABRICENCRYPTION="0"

; TCP port used by the CM brick

MATRIXCMBRICKCOMMPORT="0"

; Startup type for the SQL Server service.

SQLSVCSTARTUPTYPE="Automatic"

; Level to enable FILESTREAM feature at (0, 1, 2 or 3).

FILESTREAMLEVEL="0"

; Set to "1" to enable RANU for SQL Server Express.

ENABLERANU="False"

; Specifies a Windows collation or an SQL collation to use for the Database Engine.

SQLCOLLATION="SQL_Latin1_General_CP1_CI_AS"

; Account for SQL Server service: Domain\User or system account.

SQLSVCACCOUNT="NT Service\MSSQLSERVER"

; Set to "True" to enable instant file initialization for SQL Server service. If enabled, Setup will grant Perform Volume Maintenance Task privilege to the Database Engine Service SID. This may lead to information disclosure as it could allow deleted content to be accessed by an unauthorized principal.

SQLSVCINSTANTFILEINIT="False"

; Windows account(s) to provision as SQL Server system administrators.

SQLSYSADMINACCOUNTS="<!--REPLACE WITH ROOT NETBIOS NAME-->\svc-vra"

; The default is Windows Authentication. Use "SQL" for Mixed Mode Authentication.

SECURITYMODE="SQL"

; The number of Database Engine TempDB files.

SQLTEMPDBFILECOUNT="8"

; Specifies the initial size of a Database Engine TempDB data file in MB.

SQLTEMPDBFILESIZE="8"

; Specifies the automatic growth increment of each Database Engine TempDB data file in MB.

SQLTEMPDBFILEGROWTH="64"

; Specifies the initial size of the Database Engine TempDB log file in MB.

SQLTEMPDBLOGFILESIZE="8"

; Specifies the automatic growth increment of the Database Engine TempDB log file in MB.

SQLTEMPDBLOGFILEGROWTH="64"

; Provision current user as a Database Engine system administrator for %SQL_PRODUCT_SHORT_NAME% Express.

ADDCURRENTUSERASSQLADMIN="False"

; Specify 0 to disable or 1 to enable the TCP/IP protocol.

TCPENABLED="1"

; Specify 0 to disable or 1 to enable the Named Pipes protocol.

NPENABLED="0"

; Startup type for Browser Service.

BROWSERSVCSTARTUPTYPE="Disabled"
SQL Database Creation Script
In this case, I’m using a fixed script to create the database. However, there would be nothing stopping you from using the same edit/replace string logic on this file to create a DB name and settings that you have provided from your input JSON
USE MASTER;
IF EXISTS (SELECT * FROM sys.databases WHERE NAME ='MyDB01')
	BEGIN
		ALTER DATABASE MyDB01 SET SINGLE_USER WITH ROLLBACK IMMEDIATE
		DROP DATABASE MyDB01
	END
CREATE DATABASE MyDB01;
ALTER DATABASE MyDB01
SET RECOVERY SIMPLE;
ALTER DATABASE MyDB01
SET READ_COMMITTED_SNAPSHOT ON;
ALTER DATABASE MyDB01
SET ALLOW_SNAPSHOT_ISOLATION ON;
ALTER DATABASE MyDB01
SET COMPATIBILITY_LEVEL = 120;
ALTER AUTHORIZATION ON database::MyDB01 TO "MYDOMAIN\special-admin";
Ok. So thats the first example of an autodeployed VM. Next we will create a script to create this VM automatically based on the ISOs we have created.
Posts in this Series
- Part 1: Overview
- Part 2: Reading JSON
- Part 3: Creating a Single Binaries ISO
- Part 4: Understanding the autoUnattend.xml
- Part 5: Creating a Configure-Host.ps1 and Building the Answerfiles ISO for SQL Server
- Part 6: Creating the VM
- Part 7: Creating a New Active Directory Forest
- Part 8: Adding a Domain Controller to an Existing Domain
- Part 9: Adding a New Child Domain to an Existing Active Directory Forest

Leave a comment