

Have you ever built a VM and went a bit nuts in terms of the initial maximum size you allocated to the VMDK? Something like this?

I know I have. Extending a virtual disk with VMware Fusion is a piece of cake, but shrinking one (and by shrinking I mean reducing the maximum size of the disk) isn’t as straight forward.
Fusion Interface

So this is where you go to extend a virtual disk. The presence of an adjustment bar suggests you can drag the bar right to expand or left to shrink the VMDK, but alas you can’t drag the bar left, and trying to override the value in the text field only produces the following error
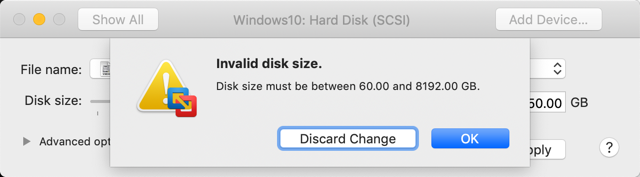
Now I know that the disk is thin-provisioned, and in the case of the above, if I successfully reduce the 60GB limit to 50GB then its not going to make any difference to the space consumed on disk, but I confess I have a touch of OCD so I wasn’t going to be happy until that maximum value read 50GB

I dug around with Dr Google for a while, and struggled to find the answer. I read that the only supported method was to use VMware vCenter Converter (which I tried) but it was real slow as it does a file based copy, and didn’t actually work for me in the end. So I kept poking around and managed to get it done – so I thought I’d share a Pro Tip that might help others get to the solution a little faster.
#Disclaimer: It worked for me. Its not a supported or documented method, so your mileage may vary, backup your VM before trying etc!!
Preparing the VM
So first of all, we need to shrink the partition on the disk so that we dont lob off the end of it when we shrink the VMDK. I advocate running a defrag of the volume at the OS level before you start.
- Disk Management -> Right Click Volume -> Shrink Volume -> Enter the size to shrink the volume by -> Shrink
Feel free to go as small as it allows, but shoot for a final volume size that is at least 4-5 GB smaller than the size you want to adjust the VMDK to. This makes it easier to manage the empty VMDK extents later, and you can always expand the volume back out to the end of the drive at the end of the process.

Now that we have a disk setup that looks like the below, we can crack on with altering the VMDK itself. Note the 14.51GB free at the moment.

Zeroing the empty space
- Create a new (temporary) simple partition that fills up the empty space that we intend to remove from the VMDK and assign it a drive letter
- Download SDelete and extract the files
- Open a Command Window, navigate to the extracted files and run
- sdelete64 -z [drive-letter]
- This writes zeros into the empty space. You might as well do the same on the system partition too. It wont hurt.
Cleaning Up the VM
- Delete the temporary partition we created in the previous section
- Power off the VM
- Virtual Machine -> Settings -> General -> Clean Up Virtual Machine
Set up your Staging Area
- Create a new working folder to manipulate the VMDK in
- Open the folder the VM is in
- You might need to right click and do ‘Show Package Contents’ if using Fusion
- Copy the VMDK file(s) to your working folder
- There may be more than one file if the VMDK is set to split into extents
Splitting the VMDK
- If the VMDK was a series of files to begin with, then you can skip this section and move to the next one, but if it was a single file then you need to split it up before proceeding (dont worry, we can consolidate it again afterwards)
- Open a Terminal Window and navigate to the folder with the copy of the VMDK file
- /Applications/VMware\ Fusion.app/Contents/Library/vmware-vdiskmanager -r Windows10.vmdk -t 1 Split.vmdk
- When done you should have a split version of the VMDK in your working folder
Shrinking the VMDK
If your VMDK was a single file to begin with, then the process of zeroing the empty space and splitting the disk should have resulted in a compact set of VMDK extents (where all the data is in the earlier extents and the last few extent files are empty). If your extents look a bit like the below image, then you are good to go.
So this process is really only necessary if your original VMDK was already split into multiple files when you started (though it will do no harm if you do it anyway). It effectively compacts the data inside the VMDK, and will leave contiguous space at the end of the VMDK that we can safely remove.
- Open a Terminal Window and navigate to the folder with the copy of the VMDK file
- /Applications/VMware\ Fusion.app/Contents/Library/vmware-vdiskmanager -k Split.vmdk

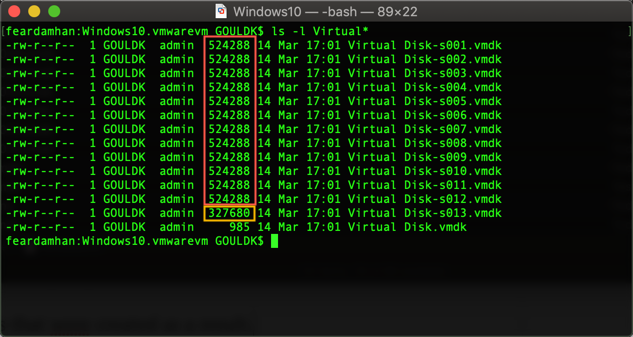
As you can see, my 60GB disk was split into 16 extents (Split-sXXX.vmdk) and a descriptor file (Split.vmdk). After the shrinking process, the last 4 of my extent files are empty as they are at the standard 524KB or smaller. The last extent is at 131KB as its just making up the difference required to the bring the total size of the extents to exactly 60GB
Remove Unwanted Extents
- Remove the empty extents as thats the space we want to remove from the disk in terms of how it appears to the VM.
- So in my case, delete:
- Split-s013.vmdk
- Split-s014.vmdk
- Split-s015.vmdk
- Split-s016.vmdk
- What we now have is pretty close to what we need – but its unlikely that the remaining 12 extents (in my case) will add up exactly to 50GB
Creating a Reference Disk
- Getting the geometry of the modified disk right is much easier if you just create a new blank one of the desired size to use as reference.
- So either add a disk to the an existing VM or create a dummy VM – just make sure you leave it as the default of Split into multiple files.

Getting the size of the split VMDK exactly right
- Take a look at the files that were created as a result of creating the reference disk
- All of the extents are empty (as its a blank disk) but you can see that we have 12 full extents (in the red box) and one partial extent (yellow box) that are needed to make a VM exactly 50GB.
- Check how many extents your real VMDK has left, in my case I have 12, so I just need the 13th (partial) extent to complete my VMDK. If you have even fewer extents left in the real VMDK, then you may need one or more empty full extents too.
- Copy that necessary extents to your working directory
- In my case ‘Virtual Disk-s013.vmdk’
- Rename the copied extent to be the continue the extent series of your split VMDK making sure than any partial extent is the last one.
- In my case rename ‘Virtual Disk-s013.vmdk’ to ‘Split-s013.vmdk’
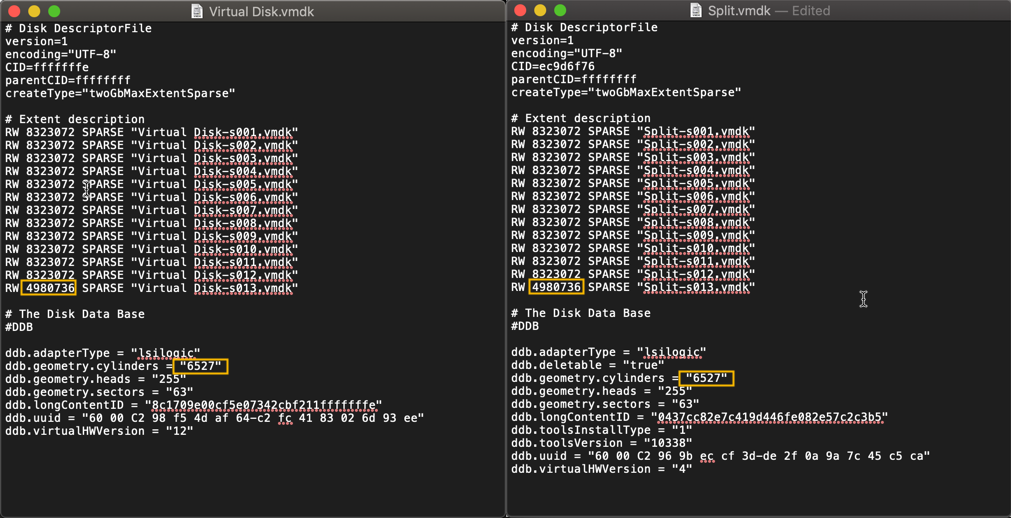
Adjusting the VMDK Descriptor File
- Take a look at the Descriptor File of the Reference disk (in my case Virtual Disk.vmdk)
- Compare it to the disk you are modifying (in my case Split.vmdk)

- Alter the configuration of the extents in the file of the disk you are modifying to match those of the reference disk file (under #Extent Description)
- Ensure its still referencing the actual extent files names for the split.vmdk
- Ensure you get the value for the last (partial) extent correct
- Alter the configuration of the ddb.geometry.cylinders in the file of the disk you are modifying to match that of the reference disk file
- Save the file
- Your resulting file should look like the below
What to do next?
You have a few choices at this point, depending on how the original VM was configured and how you want it to be long term (split disk vs single file)
- Started with Single Disk / Want to continue with Split Disk
- Remove the original single VMDK file from the VM folder
- Replacing it with the new Split Disk files
- Alter the settings of the VM to include the name of new split disk instead of the original single file version one.
- Started with Single Disk / Want to continue with Single Disk
- Remove the original single file VMDK from the VM folder
- Consolidate the split VMDK to a single file with the the original name
- Place the new consolidated VMDK file in folder of the VM
- Started with Split Disk / Want to continue with Split Disk
- Likely if it was split to begin with as you never changed the file name by having to split
- Remove the original split VMDK from the VM folder
- Place the new split VMDK in folder of the the VM
- Any combination of the above!
In my case I am going to option 2 as I started with a single disk, and want to continue with one. Options 1 and 3 are straight forward. 4 is a combination of the options as you see fit.
Consolidate the Split VMDK
If you dont need to consolidate the VMDK, based in the choice you made in the previous section, then jump to ‘Finishing the VM Setup’
- Open a Terminal Window and navigate to your working directory
- /Applications/VMware\ Fusion.app/Contents/Library/vmware-vdiskmanager -r Split.vmdk -t 0 Windows10.vmdk
Finishing the VM Setup
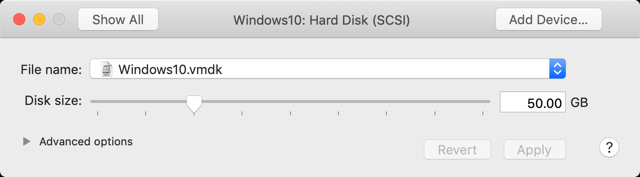
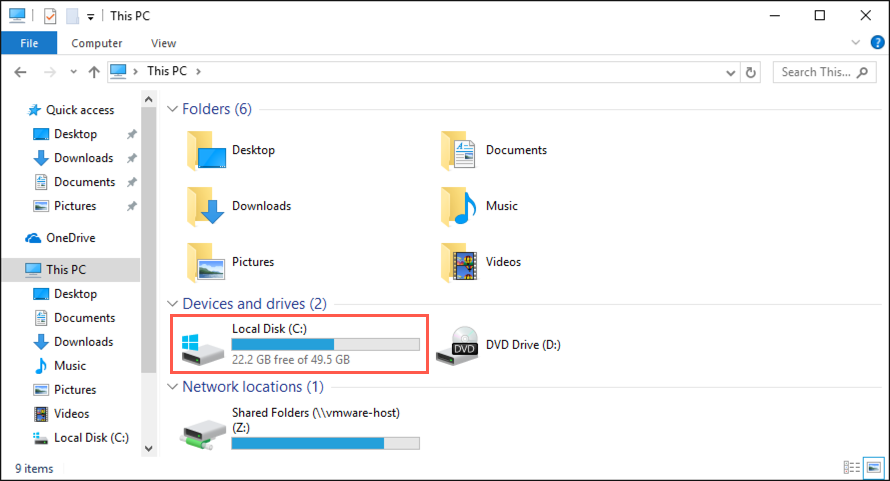
Assuming you now have the correct files in the VM folder, and have modified the VM settings (if necessary), check the settings of the hard disk and see what size it reports. In my case it now says 50GB instead of the original 60GB.
- Power on the VM -> Disk Management -> Confirm Disk is showing correct size
- In my case I now have 4.51GB free vs the 14.51GB I had free before

- Right Click -> Extend Volume -> Accept the defaults -> Finish

- And the Explorer view
Clean up you working folder, and thats it! Enjoy…..

Does the 49.5GB really put your OCD to rest?
LikeLike
Ha. Yeah. I’ve long since gotten over the things NTFS does to my head 🤣
LikeLike
This works. Relatively perplexing — how this feature isn’t included in the standard ui.
Thanks for providing this, FearDamhan
LikeLike