

Update: I decided to revise this post as despite it showing the kickstart aspect pretty well, I felt it didnt showcase the use of multi-threading as well as it could have.
As a more tangible use case for my recent post on reusing functions in multi-threaded PowerShell scripts I thought I’d share some recent work I put into our lab automation that deploys and configures multiple nested ESXi hosts in parallel for use in our VMware Cloud Foundation (VCF) testing.
Prior to this, I was using keystroke automation to deploy each of the nested hosts and while this was also multi-threaded it was taking approximately 25mins to deploy and prep a set of four hosts required to perform a VCF management domain bringup. Each set of 4 hosts was an additional 25 mins, which was time consuming when deploying management domains and workload domains for multiple VCF instances, especially if you were also doing stretched clustering.
The basic architecture of how the code works now looks like this, and I’m going to go through the items in green in this post:
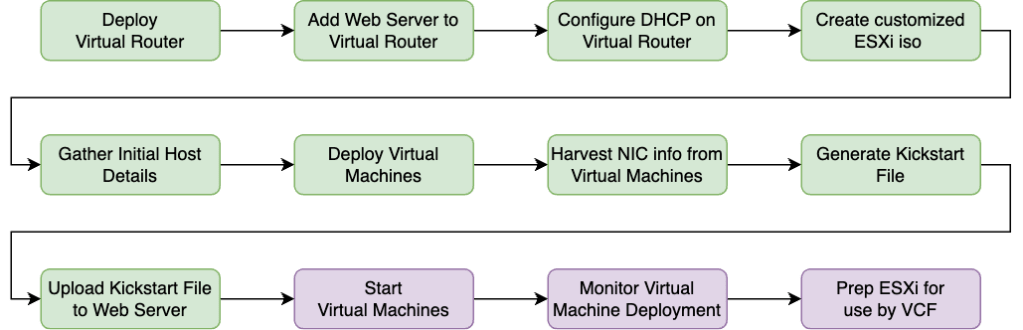
Deploy a Virtual Router
In our lab deployments for VCF, we create Identical Isolated Nested Environments so that we can deploy multiple testbeds with minimum fuss. So in my case, I already have an appliance available in each testbed that can be enhanced to deliver what I need for kickstart, namely a machine that can:
- Serve out DHCP addresses for the nested hosts
- Act as a web server to host the kickstart file they will use to self-configure when they boot.
- Be used to create customised ESXi iso files for each new build of ESXi we want to test with
So this doesn’t strictly have to be a router, but in this case, it was the perfect pre-existing appliance in each of our testbeds.
Add a Web Server to the Virtual Router
All thats needed here is a simple web server, listening on an interface that can be reached by the nested ESXi hosts when they get an IP address from the DHCP service running on the router. In my case I used Apache and made it part of the template we deploy into each new isolated testbed, but if it’s a one off, then you can just install one manually.
Configure DHCP on the Virtual Router
My router already had two interfaces:
- eth0 attached to a VLAN backed portgroup with publicly routable address
- eth1 attached to the isolated NSX segment with multiple sub-interfaces each tagged with a VLAN and suitable IP address to meet the needs of the VCF deployment.
For me, DHCP could not be placed on eth0 as I would be doing this multiple times across different testbeds and would not want any confusion caused by multiple DHCP servers popping up, all of which were serving out the same DHCP scope.
Equally I couldn’t put the DHCP server listening on eth1 as that was all sub-interfaces with VLAN tagging and the nested ESXi hosts would not have any configured VLAN on their management interfaces until after they were configured, so there would be connectivity issues.
So the solution is to add eth2, also connected to the isolated NSX segment, but with no VLAN tagging configured, and have your DHCP service listen on that interface.
Setting up parameters
For the purposes of this post (and for its companion in Part 2) I’m going to setup some input parameters that the functions use. It’s a simple setup, far simpler than I use in our lab automation and far simpler that you will likely have in your own scripting, but where the parameters come from isnt really the point of these posts.
How you choose to do this is entirely up to you. I use a combination of input files and internal algorithms in the code to create a set of PowerShell objects with all the details required.
Firstly a simple configuration which holds all the details required for the creation of the hosts themselves
$nestedHostsToCreate = @()
$nestedHostsToCreate += [pscustomobject]@{
    'mgmtIp'   = "172.16.11.101"
    'hostname' = "sfo01-m01-esx01"
    'fqdn'     = "sfo01-m01-esx01.sfo.rainpole.io"
    'vmname'   = "homelab-sfo01-m01-esx01"
    'mgmtNetmask' = "255.255.255.0"
    'mgmtVlanId' = "1611"
    'mgmtGw' = "172.16.11.1"
    'dnsServer1' = "172.16.11.4"
    'dnsServer2' = "172.16.11.5"
    'ntpServer1' = "ntp0.sfo.rainpole.io"
    'ntpServer2' = "ntp1.sfo.rainpole.io"
    'version' = "7.x"
}
$nestedHostsToCreate += [pscustomobject]@{
    'mgmtIp'   = "172.16.11.102"
    'hostname' = "sfo01-m01-esx02"
    'fqdn'     = "sfo01-m01-esx02.sfo.rainpole.io"
    'vmname'   = "homelab-sfo01-m01-esx02"
    'mgmtNetmask' = "255.255.255.0"
    'mgmtVlanId' = "1611"
    'mgmtGw' = "172.16.11.1"
    'dnsServer1' = "172.16.11.4"
    'dnsServer2' = "172.16.11.5"
    'ntpServer1' = "ntp0.sfo.rainpole.io"
    'ntpServer2' = "ntp1.sfo.rainpole.io"
    'version' = "7.x"
}
$nestedHostsToCreate += [pscustomobject]@{
    'mgmtIp'   = "172.16.11.103"
    'hostname' = "sfo01-m01-esx03"
    'fqdn'     = "sfo01-m01-esx03.sfo.rainpole.io"
    'vmname'   = "homelab-sfo01-m01-esx03"
    'mgmtNetmask' = "255.255.255.0"
    'mgmtVlanId' = "1611"
    'mgmtGw' = "172.16.11.1"
    'dnsServer1' = "172.16.11.4"
    'dnsServer2' = "172.16.11.5"
    'ntpServer1' = "ntp0.sfo.rainpole.io"
    'ntpServer2' = "ntp1.sfo.rainpole.io"
    'version' = "7.x"
}
$nestedHostsToCreate += [pscustomobject]@{
    'mgmtIp'   = "172.16.11.104"
    'hostname' = "sfo01-m01-esx04"
    'fqdn'     = "sfo01-m01-esx04.sfo.rainpole.io"
    'vmname'   = "homelab-sfo01-m01-esx04"
    'mgmtNetmask' = "255.255.255.0"
    'mgmtVlanId' = "1611"
    'mgmtGw' = "172.16.11.1"
    'dnsServer1' = "172.16.11.4"
    'dnsServer2' = "172.16.11.5"
    'ntpServer1' = "ntp0.sfo.rainpole.io"
    'ntpServer2' = "ntp1.sfo.rainpole.io"
    'version' = "7.x"
And then an even simpler object that holds all the other information we need
$otherParameters = New-Object -TypeName psobject
$otherParameters | Add-Member -notepropertyname 'vCenterFqdn' -notepropertyvalue "homelab-vc01.feardamhan.io"
$otherParameters | Add-Member -notepropertyname 'vCenterUser' -notepropertyvalue "Administrator@vsphere.local"
$otherParameters | Add-Member -notepropertyname 'vCenterPassword' -notepropertyvalue "VMw@re1!"
$otherParameters | Add-Member -notepropertyname 'datastore' -notepropertyvalue "homelab-vmfs-01"
$otherParameters | Add-Member -notepropertyname 'clusterName' -notepropertyvalue "homelab-cl01"
$otherParameters | Add-Member -notepropertyname 'segmentName' -notepropertyvalue "homelab-test-isolated-segment"
$otherParameters | Add-Member -notepropertyname 'targetIsosFolder' -notepropertyvalue "ISOs"
$otherParameters | Add-Member -notepropertyname 'routerHostName' -notepropertyvalue "homelab-test-ptr-simple"
$otherParameters | Add-Member -notepropertyname 'routerPassword' -notepropertyvalue "VMw@re1!"
$otherParameters | Add-Member -notepropertyname 'routerIP' -notepropertyvalue "192.168.15.69"
$otherParameters | Add-Member -notepropertyname 'esxiBuild' -notepropertyvalue "20328353"
$otherParameters | Add-Member -notepropertyname 'stockImageFileName' -notepropertyvalue "VMware-VMvisor-Installer-7.0U3g-20328353.x86_64.iso"
$otherParameters | Add-Member -notepropertyname 'esxiImageFileName' -notepropertyvalue "vcf4-kickstart-esxi-build-20328353.iso"
$otherParameters | Add-Member -notepropertyname 'bootDiskGB' -notepropertyvalue "32"
$otherParameters | Add-Member -notepropertyname 'MemoryGB'  -notepropertyvalue "8"
$otherParameters | Add-Member -notepropertyname 'NumCpu'  -notepropertyvalue "4"
$otherParameters | Add-Member -notepropertyname 'GuestID' -notepropertyvalue "vmkernel7Guest"
$otherParameters | Add-Member -notepropertyname 'cacheDiskGB' -notepropertyvalue "128"
$otherParameters | Add-Member -notepropertyname 'dataDiskGB' -notepropertyvalue "256"
$otherParameters | Add-Member -notepropertyname 'esxiPassword' -notepropertyvalue "VMw@re1!"
$otherParameters | Add-Member -notepropertyname 'location' -notepropertyvalue "homelab-test"
Understanding the code
The functions shown here are using the same logic mentioned in reusing functions in multi-threaded PowerShell scripts, i.e. the functions are all part of a module, so that it can be imported and the functions reused. You will notice the following line in each of the scriptblocks where it imports itself for this purpose.
Import-Module "$using:modulePath\myModule.psm1"Create customised ESXi iso
How you source the ESXi iso will depend on your situation, but in my case, given that I work for VMware and this was all for internal use, my code has the ability access to pull down any published or internal build of ESXi and customize it for use with kickstart. It also checks the local cache on the jumpbox I use and the vSphere datastore before doing so for efficiency reasons.
When I say customize, all I mean is that we will alter the boot.cfg file to point it at a ks.cfg file residing on our virtual router. No other changes are required.
The below function starts from the point where the stock ISO has already been uploaded to the ‘ISOs’ Folder on the datastore.
Function New-CustomizedEsxIso
{
    Param (
        [Parameter (Mandatory = $true)] [Array]$otherParameters
    )

    #Some parameters
    $esxiIsoDatastorePath = '[' + $otherParameters.datastore + '] ISOs\' + $otherParameters.stockImageFileName
    $customizedISOLabel = $("esxi-ks-" + $otherParameters.esxibuild)

    #Check for presence of Customized ISO file on datastores, create as required
    Connect-VIServer -Server $otherParameters.vCenterFqdn -user $otherParameters.vCenterUser -pass $otherParameters.vCenterPassword | Out-Null

    #Connect ESXi ISO to CD ROM
    $SecurePassword = ConvertTo-SecureString -String "VMw@re1!" -AsPlainText -Force
    $mycreds = New-Object System.Management.Automation.PSCredential ("root", $SecurePassword)
    Get-SSHTrustedHost | Remove-SSHTrustedHost | Out-Null
    $sshSession = New-SSHSession -computername $otherParameters.routerIP -credential $mycreds -AcceptKey
    Write-Host " Mounting Standard ISO on $($otherParameters.routerHostName)"
    $scriptText = 'eject /dev/sr0'
    Invoke-SSHCommand -timeout 30 -sessionid $sshSession.SessionId -command $scriptText | Out-Null

    Get-VM -name  $otherParameters.routerHostName | Get-CDDrive | Set-CDDrive -IsoPath $esxiIsoDatastorePath -StartConnected:$true -Connected:$true -Confirm:$false | Out-Null

    #Create ISO
    Write-Host " Creating Custom ISO $($otherParameters.esxiImageFileName)"
    $scriptText = 'rm -Rf /media/extract/*'
    Invoke-SSHCommand -timeout 30 -sessionid $sshSession.SessionId -command $scriptText | Out-Null
    $scriptText = 'mkdir -p /mnt/cdrom'
    Invoke-SSHCommand -timeout 30 -sessionid $sshSession.SessionId -command $scriptText | Out-Null
    $scriptText = 'mount -t auto /dev/sr0 /mnt/cdrom'
    Invoke-SSHCommand -timeout 30 -sessionid $sshSession.SessionId -command $scriptText | Out-Null
    $scriptText = 'cp -a /mnt/cdrom/* /media/extract/'
    Invoke-SSHCommand -timeout 30 -sessionid $sshSession.SessionId -command $scriptText | Out-Null
    $scriptText = "sed -i 's@kernelopt=runweasel cdromBoot@kernelopt=runweasel ks=http://192.168.35.1/ks.cfg@' /media/extract/boot.cfg"
    Invoke-SSHCommand -timeout 30 -sessionid $sshSession.SessionId -command $scriptText | Out-Null
    $scriptText = "sed -i 's@kernelopt=cdromBoot runweasel@kernelopt=runweasel ks=http://192.168.35.1/ks.cfg@' /media/extract/boot.cfg"
    Invoke-SSHCommand -timeout 30 -sessionid $sshSession.SessionId -command $scriptText | Out-Null
    $scriptText = "mkisofs -relaxed-filenames -V $customizedISOLabel -J -R -o /tmp/$($otherParameters.esxiImageFileName) -b isolinux.bin -c boot.cat -no-emul-boot -boot-load-size 4 -boot-info-table -input-charset utf-8 /media/extract"
    Invoke-SSHCommand -timeout 30 -sessionid $sshSession.SessionId -command $scriptText | Out-Null

    #Download customized ISO
    Write-Host " Downloading Custom ISO"
    $user = "root"
    $securePassword = ConvertTo-SecureString -String "VMw@re1!" -AsPlainText -Force
    $mycreds = New-Object System.Management.Automation.PSCredential ($user, $securePassword)
    Get-SCPItem -ComputerName $otherParameters.routerIP -Destination .\ -Path "/tmp/$($otherParameters.esxiImageFileName)" -pathType File -credential $myCreds -AcceptKey:$true #-NoProgress

    #Upload ISO
    Write-Host " Copying $($otherParameters.esxiImageFileName) to $($otherParameters.datastore)\$ISOs"
    $discoveredDatastoreObject = Get-Datastore | Where-Object { $_.Name -like $otherParameters.datastore }
    Remove-Module VMware.VimAutomation.Core -force -confirm:$false
    Import-Module VMware.VimAutomation.Core
    New-PSDrive -Location $discoveredDatastoreObject -Name DS -PSProvider VimDatastore -Root "\" > $null
    Copy-DatastoreItem -Item ".\$($otherParameters.esxiImageFileName)" -Destination "DS:/ISOs" -ErrorAction Stop | Out-Null
    Remove-PSDrive -Name DS -Confirm:$false

    #Cleanup Up
    Write-Host " Cleaning up $($otherParameters.routerHostName)"
    $scriptText = 'rm -Rf /media/extract/*'
    Invoke-SSHCommand -timeout 30 -sessionid $sshSession.SessionId -command $scriptText | Out-Null
    $scriptText = "rm /tmp/$($otherParameters.esxiImageFileName)"
    Invoke-SSHCommand -timeout 30 -sessionid $sshSession.SessionId -command $scriptText | Out-Null
    $scriptText = 'eject /dev/sr0'
    Invoke-SSHCommand -timeout 30 -sessionid $sshSession.SessionId -command $scriptText | Out-Null
    Remove-SSHSession -SessionId $sshSession.SessionId -WarningAction SilentlyContinue -ErrorAction Stop | Out-Null

    #Disconnect CD ROM
    Get-VM -name  $otherParameters.routerHostName | Get-CDDrive | Set-CDDrive -Connected:$false -Confirm:$false | Out-Null
    Get-VM -name  $otherParameters.routerHostName | Get-CDDrive | Set-CDDrive -NoMedia -Confirm:$false | Out-Null

}
The two sed commands are there to make the change to the boot.cfg regardless of the version/build of ESXi (as the format of the original content in those boot files has varied over time). Once complete, I download the customised iso from the router and upload it back to the datastore for use by the nested hosts.
Note: This only needs to be done once per build of ESXi, as it’s the contents of the ks.cfg file that will change each time and not the location or name of it. Once the file is on the datastore, that same file can be used by every nested ESXi host you want to deploy using that version of ESXi.
Here’s the function being called

Deploy Virtual Machines
Three functions involved in. Firstly the orchestrating function which does the following
- Spins out all the host deployments in parallel by launching individual PowerShell jobs for each nested host which in turn call the New-NestedEsxiVm function
- Harvests the initial MAC addresses assigned to the first NIC in each machine
- Call the New-KickStartFile function to generate and upload the kickstart configuration file
Function Install-AllNestedHosts
{
Param (
[Parameter (Mandatory = $true)] [array]$nestedHostsToCreate,
[Parameter (Mandatory = $true)] [object]$otherParameters
)
$modulePath = (Get-Location).path
$newScriptBlock = {
$Global:otherParameters = $using:otherParameters
Import-Module "$using:modulePath\myModule.psm1"
Connect-VIServer -Server $otherParameters.vCenterFqdn -user $otherParameters.vCenterUser -pass $otherParameters.vCenterPassword | Out-Null
$esxiIsoDatastorePath = '[' + $otherParameters.datastore + '] ISOs\' + $otherParameters.esxiImageFileName
New-NestedEsxiVm -clusterName $otherParameters.clusterName -vmName $using:nestedHostInstance.vmName -datastore $otherParameters.datastore -bootDiskGB $otherParameters.bootDiskGB -MemoryGB $otherParameters.MemoryGB -NumCpu $otherParameters.NumCpu -segmentName $otherParameters.segmentName -GuestID $otherParameters.GuestID -esxiIsoDatastorePath $esxiIsoDatastorePath -cacheDiskGB $otherParameters.cacheDiskGB -dataDiskGB $otherParameters.dataDiskGB -location $otherParameters.location
}
$hostDeploymentJobs = Foreach ($nestedHostInstance in $nestedHostsToCreate)
{
Start-Job -scriptblock $newScriptBlock -argumentlist ($nestedHostInstance,$otherParameters,$modulePath)
Sleep 5
}
Get-Job $hostDeploymentJobs.id | Receive-Job -Wait -AutoRemoveJob
Connect-VIServer -Server $otherParameters.vCenterFqdn -user $otherParameters.vCenterUser -pass $otherParameters.vCenterPassword | Out-Null
Foreach ($nestedHostInstance in $nestedHostsToCreate)
{
#Add additional parameters to host object dynamically to assist imaging
$vm = Get-VM $nestedHostInstance.vmname
$macAddress = ($vm | Get-NetworkAdapter | Where-Object {$_.name -eq "Network adapter 1"}).macaddress
$nestedHostInstance | Add-Member -notepropertyname "initialMacAddress" -notepropertyvalue $macAddress -force
}
Disconnect-VIServer * -Confirm:$false | Out-Null
New-KickStartFile -nestedHostsToCreate $nestedHostsToCreate -otherParameters $otherParameters
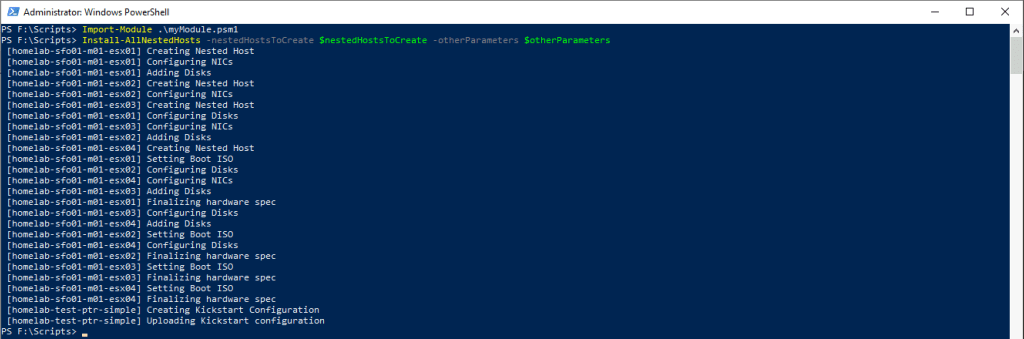
}Here is the function being called. Note how the output from each host being deployed is interwoven with the output from the other three. Thats the multi-threading in action with each host reporting back at slightly different and overlapping times
Here’s the supporting New-NestedEsxiVm function. For the purposes of the post it has a static number of NICs and disks and all the disks are SSD. You can expand that to be more complex as you see fit. In our lab automation we allow for extra NICs and extra disks and also hybrid disk configurations.
Function New-NestedEsxiVm
{
    Param (
        [Parameter (Mandatory = $true)] [string]$clusterName,
        [Parameter (Mandatory = $true)] [string]$vmName,
        [Parameter (Mandatory = $true)] [string]$datastore,
        [Parameter (Mandatory = $true)] [string]$bootDiskGB,
        [Parameter (Mandatory = $true)] [string]$MemoryGB,
        [Parameter (Mandatory = $true)] [string]$NumCpu,
        [Parameter (Mandatory = $true)] [string]$segmentName,
        [Parameter (Mandatory = $true)] [string]$GuestID,
        [Parameter (Mandatory = $true)] [string]$esxiIsoDatastorePath,
        [Parameter (Mandatory = $true)] [string]$cacheDiskGB,
        [Parameter (Mandatory = $true)] [string]$dataDiskGB,
        [Parameter (Mandatory = $true)] [string]$location
    )
    $networkPG = Get-VDPortGroup -name $segmentName
    $vmHosts = Get-VMHost | Where-Object { $_.ConnectionState -eq "Connected" -AND $_.parent -match $clusterName }
    $physicalEsxiHost = $vmhosts | Get-Random

    #Create VM
    Write-Host " [$vmName] Creating Nested Host"
    New-VM -VMhost $physicalEsxiHost -Name $vmName -location $location -Datastore $datastore -DiskGB $bootDiskGB -DiskStorageFormat Thin -MemoryGB $MemoryGB -NumCpu $NumCpu -networkName $networkPG -GuestID $GuestID -Confirm:$false | Out-Null

    #Remove Original E1000 adapter and add two VMXNET3 Adapters
    Write-Host " [$vmName] Configuring NICs"
    Get-NetworkAdapter -VM $vmName | Remove-NetworkAdapter -Confirm:$false | Out-Null
    New-NetworkAdapter -VM $vmName -portGroup $networkPG -StartConnected -Type Vmxnet3 -Confirm:$false | Out-Null
    New-NetworkAdapter -VM $vmName -portGroup $networkPG -StartConnected -Type Vmxnet3 -Confirm:$false | Out-Null

    #Add Disks required for nested VSAN
    Write-Host " [$vmName] Adding Disks"
    Get-VM $vmName | New-HardDisk -CapacityGB $cacheDiskGB -StorageFormat Thin -Confirm:$false | Out-Null
    Get-VM $vmName | New-HardDisk -CapacityGB $dataDiskGB -StorageFormat Thin -Confirm:$false | Out-Null
    Get-VM $vmName | New-HardDisk -CapacityGB $dataDiskGB -StorageFormat Thin -Confirm:$false | Out-Null

    #Make Drives look like SSD
    Write-Host " [$vmName] Configuring Disks"
    Get-VM $vmName | New-AdvancedSetting -Name "scsi0:1.virtualSSD" -Value "1" -Confirm:$false | Out-Null
    Get-VM $vmName | New-AdvancedSetting -Name "scsi0:2.virtualSSD" -Value "1" -Confirm:$false | Out-Null
    Get-VM $vmName | New-AdvancedSetting -Name "scsi0:3.virtualSSD" -Value "1" -Confirm:$false | Out-Null

    #Add CD Drive set to boot from custom ISO
    Write-Host " [$vmName] Setting Boot ISO"
    New-CDDrive -VM $vmName | Set-CDDrive -IsoPath $esxiIsoDatastorePath -StartConnected:$true -Confirm:$false | Out-Null

    # Configuring Hardware Virtualization on Nested ESXi Virtual Machine $($nestedHostInstance.vmname)
    Write-Host " [$vmName] Finalizing hardware spec"
    $vm = Get-VM $vmName
    $spec = New-Object VMware.Vim.VirtualMachineConfigSpec
    $spec.nestedHVEnabled = $true

    # Disable SecureBoot
    $spec.Firmware = [VMware.Vim.GuestOsDescriptorFirmwareType]::bios
    $boot = New-Object VMware.Vim.VirtualMachineBootOptions
    $boot.EfiSecureBootEnabled = $false
    $spec.BootOptions = $boot

    #Reconfigure VM
    $vm.ExtensionData.ReconfigVM($spec) | Out-Null

}
And the New-KickStartFile function
Function New-KickStartFile
{
    Param (
    [Parameter (Mandatory = $true)] [array]$nestedHostsToCreate,
    [Parameter (Mandatory = $true)] [object]$otherParameters
    )
    Write-Host " [$($otherParameters.routerHostName)] Creating Kickstart Configuration"
    $ksFile = "# Scripted ESXi Installation File created by Platform Tools`n"
    $ksFile += "`n"
    $ksFile += "# Accept the VMware End User License Agreement`n"
    $ksFile += "vmaccepteula`n"
    $ksFile += "`n"
    $ksFile += "# Set the root password for the DCUI and Tech Support Mode`n"
    $ksFile += "rootpw $($otherParameters.esxiPassword)`n"
    $ksFile += "`n"
    $ksFile += "# Install on the first local disk available on machine`n"
    $ksFile += "install --firstdisk --overwritevmfs`n"
    $ksFile += "`n"
    $ksFile += "# Set the network to Static on the first network adapter`n"
    $ksFile += "network --device=vmnic0 --bootproto=dhcp`n"
    $ksFile += "`n"
    $ksFile += "# reboot`n"
    $ksFile += "reboot`n"
    $ksFile += "`n"
    $ksFile += "# Set Intpreter`n"
    $ksFile += "%firstboot --interpreter=busybox`n"
    $ksFile += "`n"
    $ksFile += "# Enable SSH and the ESXi Shell`n"
    $ksFile += "vim-cmd hostsvc/enable_ssh`n"
    $ksFile += "vim-cmd hostsvc/start_ssh`n"
    $ksFile += "vim-cmd hostsvc/enable_esx_shell`n"
    $ksFile += "vim-cmd hostsvc/start_esx_shell`n"
    $ksFile += "`n"
    $ksFile += "#Configure Hosts`n"
    $ksFile += "`n"
    Foreach ($hostinstance in $nestedHostsToCreate)
    {
        $ksFile += "if esxcfg-nics -l | grep -q `"$($hostInstance.initialMacAddress)`"`n"
        $ksFile += "then`n"
        $ksFile += "esxcli network ip interface ipv4 set -i vmk0 -I $($hostInstance.mgmtIp) -N $($hostInstance.mgmtNetmask) -t static`n"
        $ksFile += "esxcli network vswitch standard portgroup set -p `"Management Network`" -v $($hostInstance.mgmtVlanId)`n"
        $ksFile += "esxcli network vswitch standard portgroup set -p `"VM Network`" -v $($hostInstance.mgmtVlanId)`n"
        $ksFile += "esxcfg-route -a default $($hostInstance.mgmtGw)`n"
        $ksFile += "esxcli system hostname set --fqdn=$($hostInstance.fqdn)`n"
        $ksFile += "esxcli network ip dns server add -s $($hostInstance.dnsServer1)`n"
        $ksFile += "esxcli network ip dns server add -s $($hostInstance.dnsServer2)`n"
        $ksFile += "esxcli system ntp set -s=$($hostInstance.ntpServer1) -s=$($hostInstance.ntpServer2)`n"
        $ksFile += "esxcli system ntp set -e=yes`n"
        $ksFile += "fi`n"
    }
    $ksFile += "`n"
    $ksFile += "#reboot once done`n"
    $ksFile += "reboot`n"
    $ksFile | Out-File ks.cfg -encoding ASCII

    #Copy Kickstart file to PTR Web Server
    Write-Host " [$($otherParameters.routerHostName)] Uploading Kickstart configuration"
    Connect-VIServer -Server $otherParameters.vCenterFqdn -user $otherParameters.vCenterUser -pass $otherParameters.vCenterPassword | Out-Null
    $copyFile = Copy-VMGuestFile -Source ks.cfg -Destination "/var/www/html/ks.cfg" -LocalToGuest -VM $otherParameters.routerHostname -GuestUser root -GuestPassword $otherParameters.routerPassword -Force -WarningAction SilentlyContinue -WarningVariable WarnMsg *>$null
    Disconnect-VIServer * -Confirm:$false
    Remove-Item -Path "ks.cfg"
}
The resulting ks.cfg file is placed on the webserver. It contains an initial section of commands common to every host, followed by a conditional section keyed off the initial first MAC address which each host will use to identify which section corresponds to them. Finally there is a common section that reboots the host.
Launch the deployment of the hosts like this
Install-AllNestedHosts -nestedHostsToCreate $nestedHostsToCreate -otherParameters $otherParametersSummary
So far we have created our nested hosts in parallel, harvested their configuration detail and setup kickstart over HTTP. In my next post I’ll cover starting the actual deployment, monitoring the deployment status and the subsequent post-configuration for VCF, at which point we will see the overall time savings achieved as a result.

Leave a comment