

Welcome to Part 2 of my VMware HCX Breadcrumb Build Series
In the last post we gathered all the detail needed to setup HCX between a Source and Destination system. This post will get the configuration up and running.
Remember that a single source can support multiple destinations, but the source element of this build needs to be done ‘per source vCenter’
Anything in the format [input_value] represents a value from your preparation that you should insert (without the square brackets of course)
Deploying HCX Manager on the the HCX Destination System
- Log into [cloud-vcenter-fqdn]
- Right click [cloud-cluster] -> Deploy OVF Template
- Name: [cloud-hcx-vmname]
- Storage
- Datastore: [cloud-datastore]
- Format: Thin Provision
- Policy: vSAN Default Storage Policy
- Network: [cloud-mgmt-portgroup]
- Customize
- DNS: [cloud-dns-server]
- Domain Search List: [cloud-ad-domain]
- Gateway: [cloud-mgmt-gateway]
- Hostname: [cloud-hcx-hostname]
- IP: [cloud-hcx-ip]
- Prefix: [cloud-mgmt-prefix-length]
- admin password: [cloud-hcx-admin-password]
- root password: [cloud-hcx-root-password]
- Enable SSH: Selected
- NTP: [cloud-ntp-ip]
- Right click [cloud-cluster] -> Deploy OVF Template
Activating and Updating the HCX Destination System
- Add [cloud-hcx-vmname] to NXS Firewall Exclusion List if you have a restricted NSX firewall configuration
- By default this is true on the management domain in a VVD on VxRail and false on the EdgeCompute domain
- Log into https://[cloud-hcx-fqdn]:9443
- User: admin
- Password: [cloud-hcx-admin-password]
- Configure your HCX System -> Continue -> Enter License Key [nsx-enterprise-plus-license] -> Activate
- Upgrade Instance
- Configuration Details:
- Location: [cloud-hcx-location]
- System Name: [cloud-hcx-fqdn]
- vCenter: [cloud-vcenter-fqdn]
- User: [cloud-sso-admin-username]
- Password: [cloud-sso-admin-password]
- NSX: [cloud-nsx-manager-fqdn]
- User: [cloud-nsx-manager-admin]
- Password: [cloud-nsx-manager-admin-password]
- SSO: [cloud-psc-lb-fqdn]
- Public Access URL: [cloud-hcx-fqdn]
- Restart
HCX Interconnect Configuration on the HCX Destination System
- Configure resource pool
- Log into [cloud-vcenter-fqdn]
- Right click [cloud-cluster]
- New ResourcePool: [cloud-hcx-resourcepool]
- Configure settings as appropriate
- Log into [cloud-hcx-fqdn] as [cloud-sso-admin-username]
- Administration -> Interconnect Configuration -> Create Interconnect Configuration
- Select Compute Resources
- vCenter: [cloud-vcenter-fqdn]
- Resource Pool: [cloud-hcx-resourcepool]
- Datastore: [cloud-datastore]
- Configure Network Profiles
- Select Network Type: Distributed Port Group
- Network: [cloud-mgmt-portgroup]
- Type: Select LAN -> Management
- IP Ranges: [cloud-hcx-management-ip-range]
- Prefix: [cloud-mgmt-prefix-length]
- Gateway: [cloud-mgmt-gateway]
- Add
- Select Network Type: Distributed Port Group
- Network: [cloud-vmotion-portgroup]
- Type: Select LAN -> vMotion
- IP Ranges: [cloud-vmotion-ip-range]
- Prefix: [cloud-vmotion-prefix-length]
- Gateway: Optional (not used in my case)
- Add
- Select Network Type: Distributed Port Group
- Network: [cloud-mgmt-portgroup]
- Type: Select WAN -> Direct Connect Network 1
- IP Ranges: [cloud-hcx-directconnection1-ip-range]
- Prefix: [cloud-mgmt-prefix-length]
- Gateway: [cloud-mgmt-gateway]
- Select Network Type: Distributed Port Group
- Static Routes -> Next
- Finish
- Select Compute Resources
Certing up the HCX Destination
Certs dont seem to be mentioned in the HCX documentation but they are vital for making a connection. If there is no shared trusted root, then do the following to enable trusted communication between the HCX appliances. This is the first step, the second being when we use this when setting up the source.
- Generate Private and Public cert file on HCX Cloud Appliance
- SSH into [cloud-hcx-ip] and execute the following
- openssl req -x509 -nodes -days 1000 -newkey rsa:2048 -keyout private.crt -out public.crt -subj ‘/C=[cloud-hcx-countrycode]/ST=[cloud-hcx-state]/L=[cloud-hcx-locality]/O=[cloud-ad-domain]/OU=hybridity/CN=[cloud-hcx-fqdn]‘
- The following files will be created. WinSCP them to the host you are doing the deployment from
- private.crt
- public.crt
- SSH into [cloud-hcx-ip] and execute the following
- Browse to [cloud-hcx-fqdn]:9443 -> Administration -> Server Certificate. Using a text editor to view the files, paste the content of
- public.crt in ‘Server Certificate’ section.
- private.crt in ‘Private Key’ section.
Installing VxRack Certs on VxRail
In my case I wanted to understand where configuring this connection could fall down so I deliberately didn’t install signed-certs on the VxRack SDDC. If this is the case for you Enterprise vCenter then you might need to carry out this process before you will be able configure HCX interconnects. BTW, the symptom of this being needed is that your HCX Interconnects will fail to install the gateway host into the destination vCenter as that vCenter wont trust the SSL cert of the source system that is trying to do that.
- Browse to https://[enterprise-vcenter-fqdn] -> Download trusted root CA certificates
- Transfer download.zip to a jumpbox used to configure the VxRail/Destination system and extract
- Browse to https://[cloud-psc-lb-fqdn]/psc -> Certificate Management -> Login -> Trusted Root Certificates -> Add Certificate
- Install \download\certs\lin\xxxxxxx.0 files (there should be one per PSC in the VxRack) where 0 is a digit that might vary
- Wait (takes several mins for them to show)
VxRack Specific Preparation Items
Because I am using a VxRack SDDC as my source, and because I dont have a common DNS system available to both source and destination systems I needed to add some entries to the unbound DNS configuration for the VxRack. Skip this step if you have full resolution for all your entries already (or if you are not using a VxRack)
- SSH into [sddc-controller-ip] root / [sddc-manager-root-password]
- vi /etc/unbound/unbound.conf
- Add entries for HCX Source System to local zone for VxRack
- local-data: “[enterprise-hcx-fqdn]. IN A [enterprise-hcx-ip]“
- local-data-ptr: “[enterprise-hcx-ip] [enterprise-hcx-fqdn]”
- Add entries for HCX Destination Systems
- local-zone: “[cloud-ad-domain].” static
- local-data: “[cloud-vcenter-fqdn]. IN A [cloud-vcenter-ip]“
- local-data-ptr: “[cloud-vcenter-ip] [cloud-vcenter-fqdn]“
- local-data: “[cloud-hcx-fqdn]. IN A [cloud-hcx-ip]“
- local-data-ptr: “[cloud-hcx-ip] [cloud-hcx-fqdn]“
- Add entries for HCX Source System to local zone for VxRack
- systemctl restart unbound.service
- systemctl status unbound.service
- Test name resolution to above items
- vi /etc/unbound/unbound.conf
- SSH into [sddc-manager-ip] root / [sddc-manager-root-password]
- vi /etc/unbound/unbound.conf
- Add entries for HCX Source System to local zone for VxRack
- local-data: “[enterprise-hcx-fqdn]. IN A [enterprise-hcx-ip]“
- local-data-ptr: “[enterprise-hcx-ip] [enterprise-hcx-fqdn]“
- Add entries for HCX Destination Systems
- local-zone: “[cloud-ad-domain].” static
- local-data: “[cloud-vcenter-fqdn]. IN A [cloud-vcenter-ip]“
- local-data-ptr: “[cloud-vcenter-ip] [cloud-vcenter-fqdn]“
- local-data: “[cloud-hcx-fqdn]. IN A [cloud-hcx-ip]“
- local-data-ptr: “[cloud-hcx-ip] [cloud-hcx-fqdn]“
- Add entries for HCX Source System to local zone for VxRack
- systemctl restart unbound.service
- systemctl status unbound.service
- Test name resolution to above items
- vi /etc/unbound/unbound.conf
Deploy the HCX Enterprise System
- Log into [cloud-hcx-fqdn]
- User: [cloud-sso-admin-username]
- Password: [cloud-sso-admin-password]
- Administration -> System Updates -> Request Download Link -> HCX Enterprise Client
- Note: The buttons to download the ova or copy the link wont even be present if internet connectivity is a problem, so if you dont see what you expect to see then check access from HCX appliance to http://hcx.vmware.com
- Log into [enterprise-vcenter-fqdn]
- Right click [enterprise-cluster] -> Deploy OVF Template
- Name: [enterprise-hcx-vmname]
- Storage
- Datastore: [enterprise-datastore]
- Format: Thin Provision
- Policy: vSAN Default Storage Policy
- Network: [enterprise-mgmt-portgroup]
- Customize
- DNS: [enterprise-dns-server]
- Domain Search List: [enterprise-ad-domain]
- Gateway: [enterprise-mgmt-gateway]
- Hostname: [enterprise-hcx-hostname]
- IP: [enterprise-hcx-ip]
- Prefix: [enterprise-mgmt-prefix-length]
- admin password: [enterprise-hcx-admin-password]
- root password: [enterprise-hcx-root-password]
- Enable SSH: Selected
- NTP: [enterprise-ntp-ip]
Configure the HCX Enterprise Appliance
- Login to https://[enterprise-hcx-fqdn]:9443
- User: admin
- Password: [enterprise-hcx-admin-password]
- Activate -> [nsx-enterprise-plus-license]-> Configure
- Location: [enterprise-hcx-location]
- Yes, Continue
- System Name: [enterprise-hcx-fqdn]
- vCenter: [enterprise-vcenter-fqdn]
- User: [enterprise-sso-admin-username]
- Password: [enterprise-sso-admin-password]
- Connect your NSX: Selected
- NSX: [enterprise-nsx-manager-fqdn]
- User: [enterprise-nsx-manager-admin]
- Password: [enterprise-nsx-manager-admin-password]
- NSX: [enterprise-nsx-manager-fqdn]
- Continue
- SSO: [enterprise-psc-lb-fqdn]
- Restart
- Assign any HCX Roles to the vCenter User Groups that you want to allow to perform HCX operations
Certing up the HCX Source
This is part 2 of the process I mentioned you might need in order to get the appliances to connect.
- Import the certificate from HCX Destination to HCX Source
- Browse to [enterprise-hcx-fqdn]:9443 -> Administration -> Trusted CA Certificate -> Import
- ‘URL’ radio button: Selected
- Provide the URL [cloud-hcx-fqdn] -> Apply.
Registering a New Remote HCX Site
- Log into [enterprise-hcx-fqdn]
- Home -> HCX -> Interconnect -> HCX Components -> Install HCX Components -> Register New Connection
- HCX Cloud Site URL: [cloud-hcx-fqdn]
- Username: [cloud-sso-admin-username]
- Password: [cloud-sso-admin-password]
- Select all three services
- HCX Interconnect Service
- WAN Optimization Service
- Network Extension Service
- Next
- Interconnect Service
- Network: [enterprise-mgmt-portgroup]
- Cluster: [enterprise-cluster]
- Datastore: [enterprise-datastore]
- Appliance name: Accept Default
- IP Address/PL: [enterprise-hcx-management-ip]/[enterprise-mgmt-prefix-length]
- Gateway: [enterprise-mgmt-gateway]
- DNS: [enterprise-dns-server]
- vMotion Network: [enterprise-vmotion-portgroup]
- IP Address/PL: [enterprise-hcx-vmotion-ip]/[enterprise-vmotion-prefix-length]
- Passwords: [enterprise-hcx-interconnect-password]
- WAN
- Bandwidth [Default]
- Network Extension
- Distributed Switch: [enterprise-vds]
- Compute: [enterprise-cluster]
- Datastore: [enterprise-datastore]
- Network: [enterprise-mgmt-portgroup]
- Appliance Name: Accept Default
- IP Address/PL: [enterprise-hcx-network-ext-ip]/[enterprise-mgmt-portgroup]
- Gateway: [enterprise-mgmt-gateway]
- Passwords: [enterprise-hcx-network-ext-password]
- Interconnect Service
- Finish
- Monitor Activity Logs on Dashboard
You should now have a system that looks a bit like this. You can repeat as necessary for other vCenter systems based on what you have available. For instance in my case I configured HCX between the management domains of the VxRack and the VxRail and I did likewise for the workload domains of each.
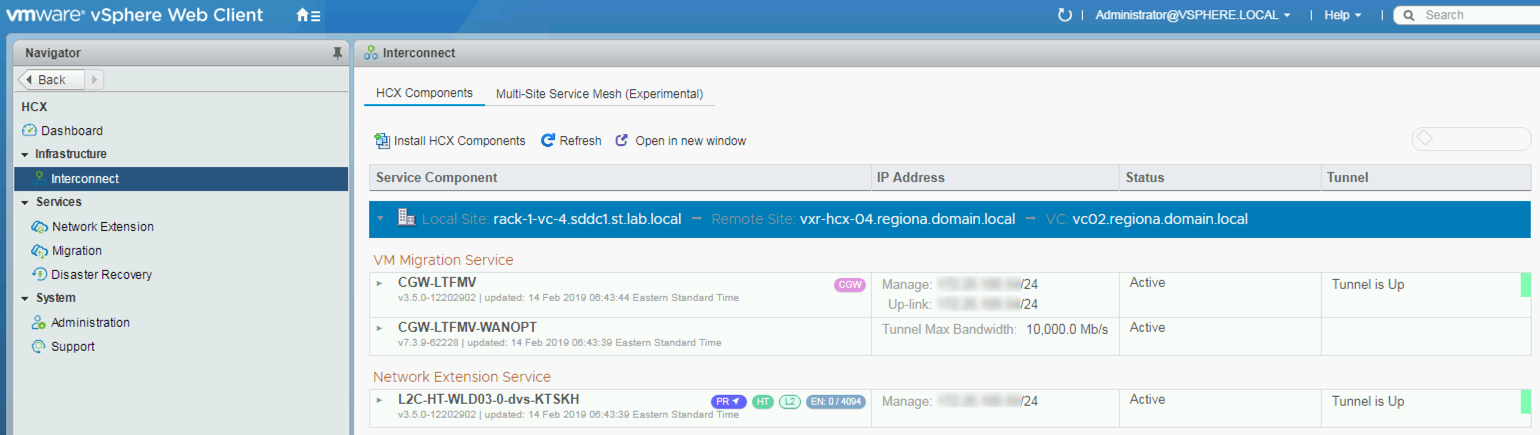
Your destination system will look a little different now as there will be new gateway hosts present in your vCenter to enable the migrations
Testing HCX
Testing is pretty straight forward.
- Deploy a test workload virtual machine in [enterprise-vcenter-fqdn]
- Home -> HCX ->Migration -> Migrate Virtual Machines -> Choose Connection –
- Select:
- One or more virtual machines
- Relevant Destination Folder
- Relevant Destination Container
- Relevant Destination Storage
- Relevant Destination Network
- Bulk Migration or vMotion
- After validation passes -> Finish
- Select:
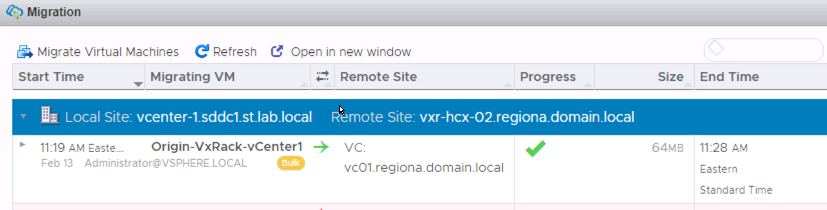
Successful bulk migrations will look like this
Successful vMotion migrations will look like this

