

I have been responsible for technical build documentation in just about all of the roles I’ve held in the 23 years of my career. Whether it was internal IT processes, solution white papers or build documentation for things like Enterprise Hybrid Cloud I’ve seen three different ways to approach build documentation depending on the audience.
I know which type I prefer to consume, but let me first put forward what I’ve seen and tried with the aid of some examples to see what you think before I give my overall opinion. I’m going to deliberately fully lay out a full section in all three manners. You dont need to worry about the technical detail (unless you happen to want to deploy a load balancer for PSCs!) but just get a feel for the depth and type of instruction each method conveys before seeing which one is for you and your audience
Bullets
Example:
- Deploy NSX Load Balancer for Platform Services Controller
Attributes:
- Its the least verbose of the three methods
- It summarises to the highest possible level, and assumes the reader knows what to do
Breadcrumbs
Example:
- Deploy NSXLoad Balancer for PSCs
- Log into vCenter – Networking & Security – NSX Edges – Add
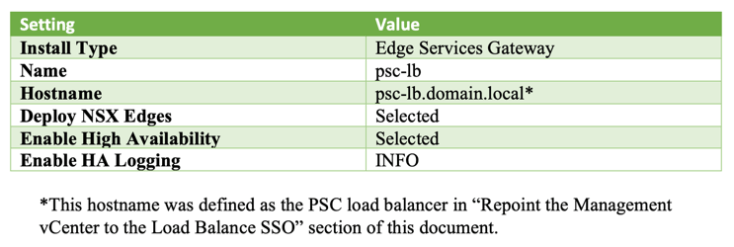
- Name and Desc
- Install Type: Edge Services Gateway
- Name: psc-lb
- Hostname: psc-lb.domain.local
- Deploy NSX Edges: Selected
- Enable High Availability: Selected
- Enable HA Logging: INFO
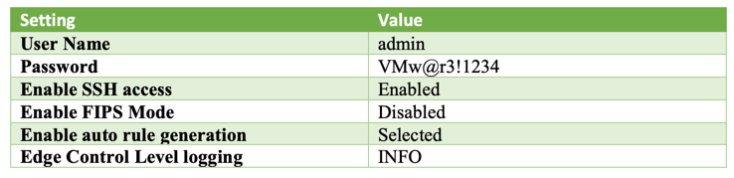
- Settings
- User Name: admin
- Password: VMw@r3!1234
- Enable SSH access: Enabled
- Enable FIPS Mode: Disabled
- Enable auto rule generation: Selected
- Edge Control Level logging: INFO
- Configure Deployment
- Appliance Size: Large
- Choose Datacenter/Datastore etc based on environment
- Add two appliances with same settings
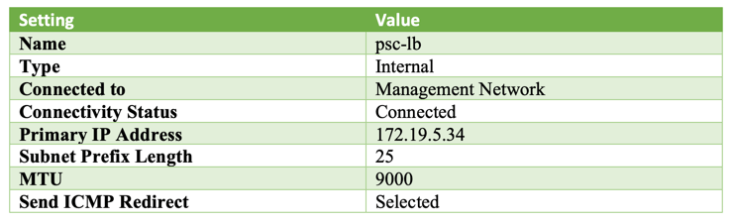
- Configure Interfaces
- Name: psc-lb
- Type: Internal
- Connected to: [Choose Management Network]
- Connectivity Status: Connected
- Primary IP Address: 172.19.5.34
- Subnet Prefix Length: 25
- MTU: 9000
- Send ICMP Redirect: Selected
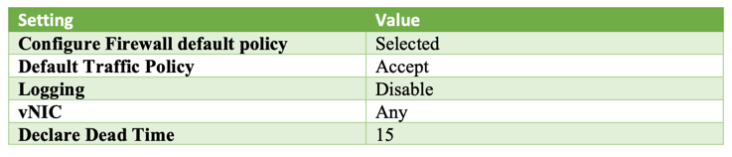
- Firewall and HA
- Configure Firewall default policy: Selected
- Default Traffic Policy: Accept
- Logging: Disable
- vNIC: Any
- Declare Dead Time: 15
- Configure Gateway
- NSX Edges – Double Click psc-lb– Manage – Routing – Global Configuration – Edit – 172.19.5.1 – Publish
- Enable the Load Balancer
- NSX Edges – Double Click psc-lb – Manage – Load Balancer – Global Configuration – Edit – Enable Load Balancer
Attributes:
- It’s not overly verbose and its written mostly in short hand.
- It tells you what to do, without telling you why. Thats for another type of document
- It makes assumptions around things like:
- knowing where/how to login to a component
- knowing who you might need to login as
- knowing that you need to click things like Next, OK and Finish
- knowing that some of the obvious screens and inputs will not be included and you are expected to know them when you see them
- It provides all the details that an experienced user will need to complete the task but ideally not a single bit more
- It’s doesn’t include screenshots or anything ‘fancy’.
Babysitter
Example:
Deploy the Platform Services Controllers Load Balancer
You configure load balancing for all services and components related to Platform Services Controllers (PSC) using an NSX Edge load balancer. The first step in deploying load balancing for the Platform Services Controller is to deploy the edge services gateway.
Procedure
- Log in to vCenter Server by using the vSphere Web Client.
- Open a Web browser and go to https://vc01.domain.local/vsphere-client.
- Log in using the following credentials.
- administrator@vsphere.local
- vsphere_admin_password
- Click Networking & Security.
- In the Navigator, click NSX Edges
- Select 172.19.5.35 from the NSX Manager drop-down menu
- Click the Add icon tab to create an NSX Edge. The New NSX Edge wizard appears.
- On the Name and description page, enter the following settings and click Next.
- On the Settings page, enter the following settings and click Next
- On the Configure deployment page, perform the following configuration steps and click Next.
- Select Datacenter01, from the Datacenter drop-down menu.
- Click Large to specify the Appliance Size.
- Click the Add icon, enter the following settings, and click OK

- To create a second appliance, click the Add icon again, make the same selections in the Add NSX Edge Appliance dialog, click OK, and then click Next.
- On the Configure interfaces page, click the Add icon to configure the psc-lb interface, enter the following settings, click OK, and click Next.
- On the Default gateway settings page, click Next
- On the Firewall and HA page, select the following settings and click Next
- On the Ready to complete page, review the configuration settings you entered and click Finish.
- Configure the Default Gateway
- In the Navigator, click NSX Edges.
- Select 172.19.5.35 from the NSX Manager drop-down menu.
- Double-click the device labeled psc-lb.
- Click the Manage tab and click the Routing tab.
- Click Edit to configure the Default Gateway.
- In the Edit Default Gateway dialog, enter 172.195.1 for the Gateway IP and click OK.
- Click Publish Changes.
- Enable the Load Balancer service
- In the Navigator, click NSX Edges.
- Select 172.19.5.35 from the NSX Manager drop-down menu.
- Double-click the device labeled psc-lb.
- Click the Manage tab, click the Load Balancer tab, click Global Configuration, and click Edit.
- In the Edit load balancer global configuration dialog, select Enable Load Balancer and click OK.
Attributes:
- This approach is the most verbose of the three
- Its a step by step, every mouse click description of what needs to be carried out
- It sometimes justifies what its going to do, or references back to other parts of the overall documentation
- It assumes nothing
- It leverages diagrams, tables and any other document element that helps structure the content
Opinion
Bullets
- This form of build instruction documentation is really only for those that are already intimately familiar with the subject matter.
- Challenges:
- It’s ok, in my opinion, as a high level process but never really suitable as proper instruction where a deterministic and consistent outcome is required. You will get a liquorice all-sorts of configurations when executed by different users. Guaranteed.
- With the above example, if one didn’t already know the configuration parameters to configure a load balancer for PSCs then you would have no idea what to do next.
Breadcrumbs
- This type of instruction is suited to someone that knows their way around the components in question but might need a pointer to the right place to configure something or the right parameters to use
- To a proficient user, this is the ultimate cheatsheet. In most cases, the user will not need the navigation elements, and will be just looking to use this as a reference point to ensure they are putting in the right settings.
- In can also be used as a form for preparation by filling out the fields with the values that will need to be inserted.
- Copy/Paste is often used to move settings from the documentation to the configuration page of the component.
- Its intended audience are those that are competent and desire the docs to ‘cut to the chase’.
- Challenges:
- If used by in-experienced users, they may never really get to know ‘why’ some of the instructions are the way they are, and therefore never really learn.
- Its not always considered ‘polished’ enough for the public domain
Babysitter
- This is the most common form of instruction you will see in the public domain, and with good reason. Why? Plausible deniability i.e. if you configured it wrong, the author cannot be held to task for not giving every single instruction to the letter
- Its instruction depth is really useful for those that are not familiar with the component, and it therefore sometimes includes screenshots to help folks navigate an unfamiliar UI.
- Its intended audience on paper is often those that are competent in the configuration of component A,B,C but ironically then instructs them as if they were completely the opposite.
- As you can see from the example, a relatively concise task can get quite lengthy when described in this fashion, and with a complex configuration, the length of a build document can quickly snowball into several hundred pages.
- Challenges
- Authors
- Many times the same process is repeated in a doc. If you avoid repetition it can be hard to maintain a flow when you keep linking to other parts of the doc. Conversely, it’s hard to maintain consistency if you repeat the content.
- Keeping the depth and formatting consist across a lengthy build doc can be tricky, especially with multiple authors.
- Experienced Users:
- Can fall into the trap of ‘I know how to do that’ and do it their own way leading to slight configuration errors that bite them later
- Often scan the doc, and miss vital details in ‘the noise’
- In-experienced Users:
- The sheer length of these build docs can be a problem in that seeing a 500 page doc on a subject you dont know immediately makes it daunting.
- They become automatons during the process, and while they may get the job done, they likely didn’t learn a whole lot, and would need the same doc again if doing it a second time.
- Authors
Summary
It’s not easy to get build documentation right, and it’s certainly not easy to please all audiences. I do have some pieces of advice based on my own experiences:
- Avoid Bullet style (unless you are writing a blog post that includes it!) as you will never get the desired outcome
- Where possible use documentation tools that allow for Breadcrumb style layout, with the ability to drill down into Babysitting mode if the user reaches a part they really dont know. If you cant do that, try to find a middle ground between the two styles.
- Follow the flow of the interface. If there are series of settings to be configured, make sure you present them in the order the user will see them in and with the exact same labels.
- If doing Breadcrumbs, that doesn’t mean you can’t present a nicely formatted document. Not everything needs to be written in Notepad 🙂
- Be careful when writing Babysitter documents.
- When processes are repeated, make sure they are consistent. There is nothing worse than the same process looking different in different parts of the doc. Rely on a good authoring tool to avoid consistency issues
- Dont stray in terms of the format, be militant in ensuring the same approach is taken in terms of how you describe navigating interfaces etc
- Be cutthroat when it comes to diagrams. Only use them when you feel they are really needed.
- Keep the document as short as is humanly possible to keep the reader engaged.
- Accept upfront that you will not get it right the first time. What you take from your own authoring will be completely misread by others, simply because of writing style, or because there will be those with a different native language following this document too.
- Be willing to accept and implement feedback. Welcome it, even thank the user! Remember its for them that you are writing it……
P.S. One last thought….when it comes to building, the best type of documentation is the type that describes how your build automation rocks. Thats where its at!!

Leave a comment