

The team I work in are pretty heavy slack users. The organisation we work in is rather large and therefore while we had a need for a single workspace, the situation where everyone could see content from all the channels wasn’t really cutting it.
So we got into the habit of creating dedicated channels for different topics and we had quite a few ‘private’ channels where only those explicitly invited to them could see the content.
Changing a Public Channel to a Private channel is straight-forward and part of Slacks native functionality. However, when we had cause to port a channel to a new workspace we quickly found out that there are a few limitations when it comes to private channels:
- You cannot change a private channel back to being a public channel
- You cannot export or import a private channel using Slacks native tools.
Not to be undone, I did a bit of digging around, and found a way, with one main caveat – that the import doesn’t like the attachments, screenshots etc. That may be resolvable…it just didn’t bother me enough to work it out.
Details below (provided with no warranty, your mileage may vary, please test with a dummy channel first warnings etc) !
Step 1: Backing up the data
As I mentioned, Slack doesn’t provide this functionality when it comes to private channels, but there is a tool out there that does. Backupery for Slack (https://www.backupery.com/products/backupery-for-slack/) has a free and a paid version. Depending on your needs, you may get away with the free version, which I am going to use for demonstration purposes here. The paid version gives you better scale, so pay the good folks if you are going to use it to get you out of a hole 🙂
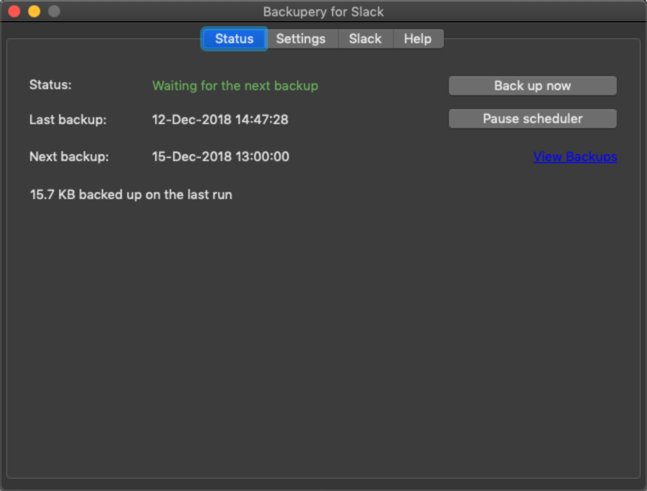
Download, install and launch Backupery and you should get a screen like the below.

Click ‘Run backup wizard’.
The subsequent screen relates to the when and where for your backups

You can change the above settings if you want, and then click Start. Most likely this will fail as Backupery isn’t authorized in your Slack Workspace. If thats the case, you will see the screen below

It will also have popped open a browser with something like the below. If you have multiple workspaces make sure you are logged into and are authorizing the correct one!

Once Authorized, the backup should jog on all by itself

Note below the limitations of the free version. Buy the full version if you need to remove them.

If all went well, you should have a backup of your slack data
Step 2: The Magic
So this requires a little bit of JSON skill. A good text editor like Sublime Text or Notepad++ will make your life a bit easier.
Click on the View Backup button from the Status screen in Backupery, and it should open the folder where the backup was stored, and there should be a folder there with the date-time that the backup was taken. Open the folder and the RawBackup subfolder

Here you’ll find a zip file with your backup data. Extract that and open the resulting folder. Let’s consider the resulting extracted folder as the ‘root’ of what we want to manipulate.

Here you have some key files and folders for this process.
The channels.json file and every folder in the root that doest start with an ‘underscore’ relates only to your public channels.
For this post I’m going to convert one private channel called private-channel-one. Remove any public channels folders from the root folder – in this case random and general. Also remove the channels.json from the root.
Peek inside the _privatechannels folder and you will find the files you need

Move the private-channel-one folder and the channels.json up to the root folder and edit the channels.json file

Note the two key values highlighted. Change both is_group and IsPrivateGroup from true to false. Remove any JSON nodes for the channels that you are not messing with just to be safe. Save the JSON file.
Note: If you can process multiple channels at the same time, just make sure that each corresponding folder is moved from the _privatechannels folder to the root, and that you modify the above values for each channel.
Now zip up the root folder into a new zip file. The zip file (in this case) should therefore contain the following
- _conversations
- _privatechannels
- private-channel-one (replace this with your own channel(s))
- channels.json
- users.json
Note: In my testing, I found that Step 3 (importing) failed when there were attachments. Not obvious at first, as the import silently bombed when it came across the first attachment in the channel. The result is a partial import, up to that point. I just did a rollback (shown later), deleted the attachment files found inside the channel folder (private-channel-one above) as I didn’t really care for them anyway, re-did the zip and redid the import. If anyone takes this testing further to get the attachments in too, let me know and I’ll update the post.
Step 3: Importing the data
In your Slack client click on the private channel in question (note the padlock icon), click the gear icon, additional options, hold on to your underwear, click Delete this Channel and confirm. Make sure you have the original backup zip file in a safe place, and know where your nearest exit is 🙂

Then on the workspace itself, click the drop down, Administration and Workspace Settings.

Click on Import/Export Data

Click on Import next to Slack

Choose the zip file we created earlier and click Start Import

In my experience it will sit with a status of ‘Waiting‘ indefinitely even when its actually done.

But if you refresh, you will see the true status. Click the Information Required button

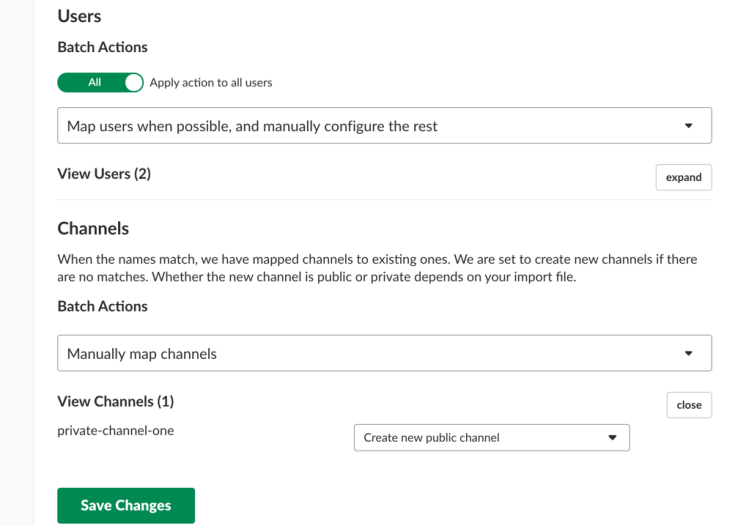
On the next screen
- Change from ‘Unmapped‘ to ‘All‘, leave the default of ‘Map users when possible, and manually configure the rest‘ as is.
- Click on ‘expand‘ to view the users, and map them accordingly. If you are doing this within the same workspace it should all line up nicely. If you are also moving the channel to a new workspace, this is an opportunity to map old workspace users to new workspace users, and Slack does a really neat job of making all the old posts look like they were made by new workspace users
Note: You can prune out users that you dont want to do anything with by editing the users.json file found in the root folder in Step 2 before you make the zip for upload. Out of scope here, but if you are comfortable with this process, then that should be a doddle for you.

When all the users are mapped, you are pretty much good to go. The default action is to ‘Create new public channel’ (which is our goal here). You can change that accordingly if you want to do something slightly different. Click ‘Save Changes‘
Confirm you are happy with the settings and click ‘Yes, proceed with import‘

As with the upload, the status stays at ‘Importing‘ for me indefinitely – just refresh (you’ll also get email updates when uploads, restores etc finish……which is neat if the content is huge)

Pop over to your workspace and check out the new channel. Note that in this case it’s still called ‘private-channel-one‘ because that was just the text string I used to name the channel, but it now has a neat hash tag next to it instead of padlock.
Huzzah, its now public!

If for some reason you are not happy with the result, your progress screen on the import section of Slack should give you the option to rollback. That will tear down anything it just did (as part of the import……it will not restore the private channel you deleted, as that was a different operation)!
You can play with the JSON content to rename the channel as you import (in case that ‘Delete this Channel’ is just too scary until the import is done).
Hope you find this useful!
Any comments, suggestions, improvements, let me know!

Thanks for the guide! Even though the program seems to have changed in how it saves and stores the backup up files, I still got the idea of it how was supposed to work from what you write.
Also that attachments seems to be working now again due to a change with how the program backs them up, in that instead of downloading and uploading them again in instead seems to just use the same URL link that Slack is storing the files on.
Only issue is that there seems to be a oddity with it not importing some of the threaded messages properly, but I think has something to do with the program itself and not due to me having haved edited the JSON files.
LikeLike
Hello!
Backupery for Slack developer is here. I understand that I’m late to the party, but it’s better late than never 🙂
First, thanks so much for referencing our tool in the article, I’m really appreciating that.
As Dave247 mentioned, we’ve updated the export structure, so you don’t need to do the operations listed in Step 2. By default, a zip file produced by the application is suitable for importing to Slack so you can create a new public channel from a private one or merge the private channel with an existing channel.
Also, we’ve fixed the issue that prevented the app from exporting threaded messages correctly, it works now.
Please also note, the files from the private channels are not completely imported. I’ve created the post why: https://www.backupery.com/slack-import-tool-doesnt-import-files-from-a-zip-archive-produced-by-backupery-for-slack-or-backupery-for-slack-workspace/
Hopefully, this will be changed in the future.
Please let me know if you have any questions, I’d be happy to help!
LikeLike
Thanks Denis. It never ceases to amaze me that of all the posts on my blog, the post to convert slack channels is by far and away the most read. Hopefully your notes above will make it even easier for folks to do it successfully.
LikeLike
Hi feardamnhan,
It seems the process has changed, but I would love an update of how to go about this now!
Thanks
LikeLike
Hello, Backupery for Slack developer is here. I’ve just decided to put the link to the updated manual for converting the channels as the original post seems a bit outdated: https://www.backupery.com/how-to-convert-a-private-channel-to-public-on-slack/
Feel free to ask me if you have any questions!
LikeLike
Thanks for that. Haven’t had time to try it again since, but good to have the breadcrumb if anyone needs to adapt what I did before!
LikeLike